
MyQ X can import and synchronize users from a CSV file.
Guidance on when to use this source is provided in the Deployment guide. See User Synchronization.
Prerequisites
-
A CSV file accessible from the MyQ server, formatted according to the syntax described in this article.
-
If authenticating users against an external server rather than the MyQ database, an LDAP or RADIUS authentication server configured in MyQ at MyQ > Settings > Authentication Servers.
Key Considerations
CSV is not a live directory. Unlike LDAP or Entra ID synchronization, CSV sync reflects only the contents of the file at the time the sync runs. If users are added or removed from the organization, the CSV file must be updated manually before the next sync.
Column order matters only when there is no header row. By default, MyQ reads column names from the first row of the CSV and maps them regardless of order. If the No header line option is enabled, columns are mapped by their position in the file, in the order listed in the CSV File Syntax table below.
A sample CSV file is available at C:\ProgramData\MyQ\Data\Import\Users_example.csv. Populate it with your data and import it directly, or use it as a formatting reference.
Create a CSV Synchronization Source
-
Go to MyQ > Settings > User Synchronization and click +Add.
-
Select Add CSV source. The CSV synchronization properties panel opens.
-
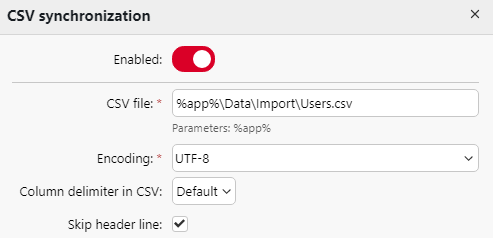
Set the path to the CSV file in the CSV file field and configure the synchronization options.
-
Click Save.
Configuration Options
|
Setting |
Description |
|---|---|
|
Enabled |
Enable or disable this synchronization source. |
|
CSV file |
Path to the CSV file on the MyQ server. Use |
|
Encoding |
Character encoding of the CSV file. The default depends on the OS settings of the computer where you access the MyQ Web Interface. |
|
Column delimiter in CSV |
Delimiter used in the CSV file. If set to Default, MyQ uses the delimiter configured on the General settings tab. |
|
No header line |
When disabled (default), the first row is read as a header row and columns are mapped by name. When enabled, the CSV must contain no header row and columns are mapped by position. |
|
Import groups under this group |
Places all imported groups as children of an existing MyQ group. |
|
Synchronization source |
Assigns a custom source name to users imported from this file. Useful when using CSV to update users originally imported from an LDAP source – set this to match the LDAP source name, or enable Ignore synchronization source. |
|
Ignore synchronization source |
When enabled, this source considers all users in MyQ regardless of which source imported them. When disabled, the source only updates users it originally imported. |
|
Use authentication server |
Authenticates imported users against an LDAP or RADIUS server rather than the MyQ database. |
|
Authentication server |
The LDAP or RADIUS server to use for authentication when Use authentication server is enabled. |
|
Deactivate missing users |
Deactivates users imported from this source who are no longer present in the CSV file. Combine with Ignore synchronization source to also deactivate users from other sources. |
|
Add new users |
Imports new users from the CSV file. If disabled, only existing MyQ accounts are updated. |
|
Pair users by personal number |
Matches users by personal number rather than username during re-sync. Useful when updating users whose usernames will change – for example, during an AD-to-Entra ID migration. |
|
Convert user name to lowercase |
Prevents duplicate accounts caused by case differences in usernames. |
|
Cards |
Sync mode for card values: Do not synchronize, Full synchronization, Synchronize if not empty (default), or Add new. |
|
PIN |
Sync mode for PIN values: same options as Cards. |
|
Groups |
Sync mode for group memberships: same options as Cards. |
|
Delegates |
Sync mode for delegate assignments: same options as Cards. |
CSV File Syntax
Column names are case-sensitive. Columns can appear in any order when a header row is present. Simple values (single words, plain numbers) can be written as-is; values containing spaces, commas, or special characters must be enclosed in double quotation marks.
|
Column |
Required |
Description |
|---|---|---|
|
|
Yes |
User's full name. Enclose in double quotes, for example |
|
|
Yes |
Login name and optional aliases. The login should match the user's domain login name. Separate multiple aliases with commas, for example |
|
|
No |
User's primary email address, for example |
|
|
No |
ID card number in the format read by the card reader, for example |
|
|
No |
Group or group tree branch. Separate levels with vertical bars and multiple groups with commas, for example `"Activities |
|
|
No |
Personal number. Must be unique per user. Used for pairing users across sync sources. |
|
|
No |
Folder path or email address for scan delivery, for example |
|
|
No |
One or more PINs. Must be in hashed MD5 format, for example |
|
|
No |
Groups the user manages. Use the same path syntax as GROUPS. For example, `"Activities |
|
|
No |
Domain for user authentication, for example |
|
|
No |
User's phone number, for example |
|
|
No |
Default language abbreviation, for example |
|
|
No |
MyQ password in hashed MD5 format, for example |
|
|
No |
Internal MyQ parameter. Must be left empty. |
|
|
No |
Delegates who can print on behalf of this user. Separate multiple delegates with commas, for example |
|
|
No |
Comma-separated list of alternate email addresses. |
|
|
No |
User's department, for example |
|
|
No |
Custom field 1 from the user profile. |
|
|
No |
Custom field 2 from the user profile. |
|
|
No |
Custom field 3 from the user profile. |
Example CSV:
"FULLNAME";"USERNAME_ALIASES";"EMAIL";"CARDS";"GROUPS";"CODE";"SCANSTORAGE";"PIN";"MANAGED_GROUPS";"AUTHSERVER";"PHONE";"LANG";"PWD";"EXTID";"DELEGATES"
"Thomas Pineapple";"Tom,Tommy,Apple";"t.pineapple@domain.com";7E9700C9;"Activities|Outdoor|Swimming,Activities|Outdoor|Birdwatching";22212;"\\Users\Tomy";14BFA6BB14875E4;Birdwatching;testAD.local;080008020;en;18BFA6BB14875E8;;"Carol,Kohei,Eliot"
Run and Schedule Synchronization
To run synchronization immediately, go to MyQ > Settings > User Synchronization, select the source, and click Synchronize now. If configured correctly, synced users and groups appear under MyQ > Users.
To synchronize automatically on a schedule, go to MyQ > Settings > Task Scheduler and configure the User Synchronization task.