
Each individual user has their own properties panel. To open the panel, double-click the user on the list on the Users main tab (or right-click the user, and then click Edit). The properties panel opens on the right side of the screen.
The panel is divided into General, Groups, Queues, and Delegates tabs. If Credit accounting is enabled for the user, the Credit tab is also available.
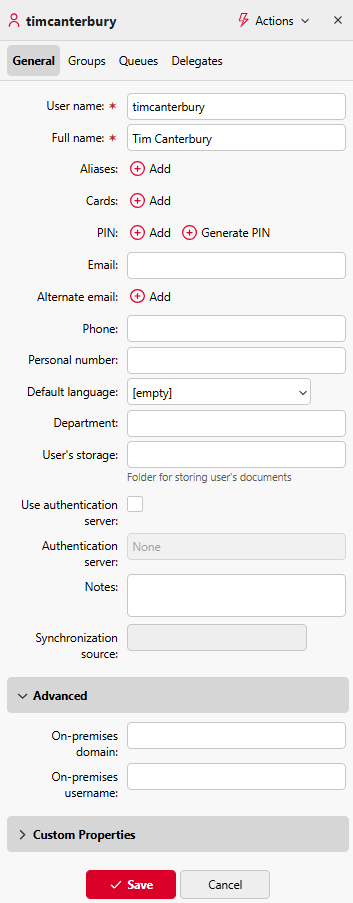
General User Properties
|
Property |
Description |
|---|---|
|
User name |
Unique identifier used to identify and authenticate the user. Must be unique across all accounts in the installation. MyQ compares this value against the identifier extracted from incoming print jobs to match jobs to users. |
|
Full name |
Display name shown in the MyQ Web Interface, on terminal screens, and in reports. Typically first name and surname. In Active directory and Open LDAP, this property corresponds to the |
|
Aliases |
Alternative usernames that allow the same user to log in or send jobs using different identifiers – for example, a UPN alongside a |
|
Cards |
ID card number used for login at embedded terminals. Can be set manually, imported during synchronization, or registered by the user at the terminal. Multiple cards can be assigned to one account. |
|
PIN |
Personal identification number for access to the MyQ Web Interface and terminals. Multiple PINs can be assigned. PINs can be Persistent (never expire) or Temporary (expire after a defined period). Automatically generated PINs are recommended for security. |
|
|
Primary email address. Used for PIN delivery, scan-to-email, and system notifications. |
|
Alternate emails |
Additional email addresses that can be used as scan destinations. |
|
Phone |
Contact phone number. Informational only – not used by MyQ for any automated function. |
|
Personal number |
Optional secondary identifier. Can be used in place of the username when pairing users across synchronization sources, or as a stable identifier during username changes. |
|
Default language |
Language used for the user's Web Interface and terminal screen. |
|
Department |
Optional organizational field. Can be populated manually or via synchronization. Used in reports and for grouping. |
|
User's storage |
Default destination for scanned documents – a folder path, email address, or other configured target. Used by Easy Scan and Easy Print terminal actions. |
|
Use authentication server |
When enabled, the user's credentials are validated against an external directory service (LDAP or RADIUS) rather than the MyQ database. |
|
Authentication server |
The external server used for credential validation when Use authentication server is enabled. |
|
Notes |
Internal free-text field for administrator notes about the account. Not visible to the user. |
|
Synchronization source |
Identifies which synchronization source imported this account. Used by MyQ to determine which source is responsible for updating the account on subsequent syncs. |
|
Advanced |
Displays the synchronized on-premises domain and username for hybrid Entra ID users. Both values can be edited manually but are overwritten on the next Entra ID synchronization. |
|
Custom (1–3) |
Three additional fields available for mapping any other attributes from a synchronization source that do not correspond to a standard MyQ property. |
Adding Users to and Deleting Users from Groups
To add a user to a group on the user properties panel, in the Groups tab:
-
On the bar at the top of the Groups tab, click +Add. The Select group dialog box appears.
-
In the Select group dialog box, select the groups where you want to add the user to.
-
Click OK.
A user can also be added to a group on the Users main tab using drag and drop. Drag the user and drop it on the group icon on the groups tab on the left side of the screen.
Default group and Group manager options
On the bar at the top of the Groups tab, you can see two options: Accounting and Manager.
The Accounting group is the group where the user is counted in reports and it is set to every user by default.
If you make a user the Manager of a certain group, the user can see jobs and reports of all the users from the group. If this group contains subgroups, the user inherits the Manager role also for all these subgroups. To make the user a manager of a group, select the group and click Manager.
To remove a user from a group:
On the bar at the top of the Groups tab, click –Remove. The group disappears from the Groups tab.
To remove selected users from a group on the Users main tab, select the group there, select the users that you want to remove, click Actions, and then click Remove from group in the Actions drop-down box.
Queues Tab Overview
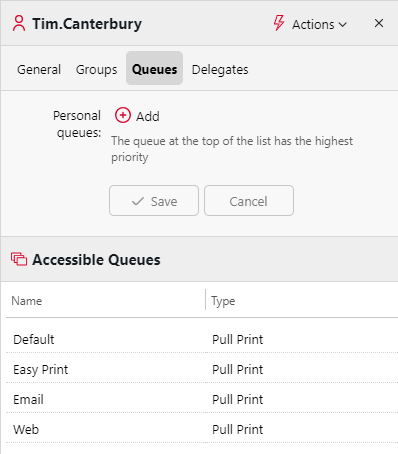
On the Queues tab, you can add Personal queues for a specific user, and see all the queues that the user can send jobs to.
Selecting User Delegates
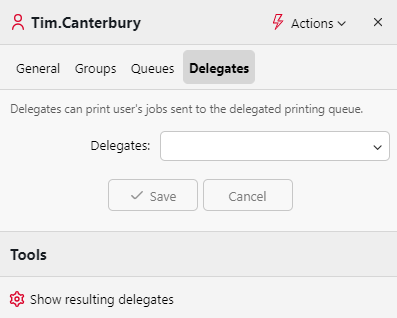
On the Delegates tab, you can select delegates (users or groups) who are able to print all of the delegating user jobs sent to a Delegate printing type of queue. The delegate will see the jobs on the embedded terminal. The print jobs are displayed in the form: (Sending user**Name of the print job).
Users need to have rights to a delegate printing type queue to be able to select delegates.
Select delegates
On the bar at the top of the Delegates tab, in the Delegates combo box, enter the user (or the group of users), and then click Save. This way, you can add multiple users (or groups of users).
Deselect delegates
On the bar at the top of the Delegates tab, in the Delegates combo box, point to the user (or group of users) that you want to deselect, and then click the remove button (X) on the right side of the user (or group of users).
Show resulting delegates
You can use the Show resulting delegates tool to show you each delegate for a specified user. This is helpful if you have added one or more user groups as delegates for a user, and will show each user who is now a delegate as a result of adding their user group.