
On the Job Receiving tab of each queue, you can set how a job is parsed and other job receiving options.
Job Parsing
-
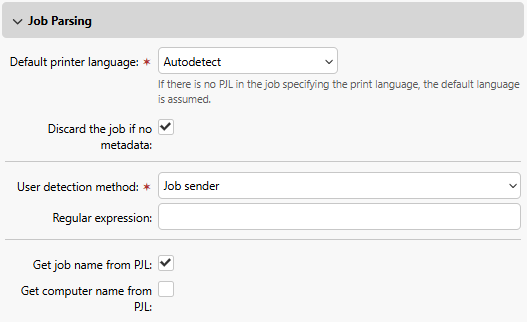
Default printer language: Choose the default printer language from the drop-down menu. The available options are:
-
Unknown
-
Autodetect (default setting)
-
PCL 5
-
PostScript
-
ESC/P
-
Prescribe
-
PCL 6
-
PDF
-
JPEG
-
XPS
If there is no PJL in the job specifying the print language, the default language is assumed.
-
-
Discard the job if no metadata: If this option is selected, MyQ discards all jobs that do not contain metadata from the Job Parser. It can be used together with the Credit or Quota features to prevent printing jobs without necessary information (number of pages, color etc.). When a job is discarded due to this setting, the following message appears in the MyQ Log: "Job metadata is required for the queue but the job parser is turned off. Job is canceled. | queue=QueueX".
This option requires Job Parser to be enabled. -
User detection method: Select how the job owner is identified.
-
Job Sender (default)
-
Sender’s computer name
-
Print Server’s DNS name
-
Sender’s computer DNS name
-
Detect user from the job name
-
User detection from PJL
-
-
Regular expression: You can use regular expressions to capture a part of the string that MyQ detects within any of the user detection methods. MyQ uses regular expressions with the ECMAScript engine, meaning that the first captured group is used: first, MyQ finds the first match for the regular expression, and then it identifies the job owner with the first group captured in the match. This way you can search for a string and define which part of it will be identified as the job owner. For example, you can use the regular expression to find an email address in the detected name string and use the group capturing to save just the part preceding the @ symbol.
-
Get job name from PJL: With this option enabled, MyQ takes the job name from the JOB NAME parameter in the PJL header instead of detecting it from the LPR protocol.
-
Get computer name from PJL: With this option enabled, MyQ takes the computer name from the PJL header instead of detecting it from the LPR protocol.
PJL Detection
These settings apply only if the job property is set to be detected from PJL in the Job parsing section. Click +Add to select a PJL property (from Job name, User name, Hostname and Domain) and set variables and regular expressions, Edit to modify any existing variables.
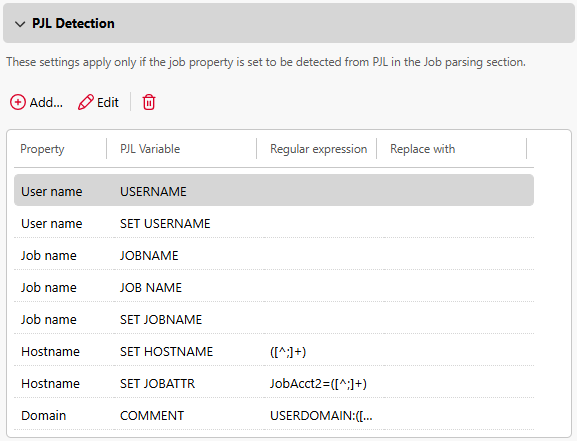
The job name in the PJL header may differ from the printed document's name.
See also: User Detection from PJL
Jobs via IPPS
This section appears only when Jobs via IPPS is enabled in MyQ > Settings > Jobs.
Address
View the address that you must use to direct jobs to this queue for IPPS printing, in the format:
https://{hostname}:{port}/queue/{queue-name}
Release Options
You can select from the following release options for IPPS printing:
-
MyQ default release options
-
Pass-through options of a selected printer (pass-through mode): select which printer is used as the source of IPP attributes. This controls which printer capability profile is presented by the queue. If the printer is not found, the default release options are applied.
Only the Job sender user detection method can be used with IPPS printing.
See also: Jobs via IPPS
Jobs via Mobile Devices
When enabled, the queue is available to the MyQ X Mobile Client and can be published as a discoverable printer for AirPrint on iOS, iPadOS, and macOS, and Mopria Print Service on Android.
To enable mobile printing for the queue, set Jobs via Mobile Devices to Enabled and click Save.
AirPrint and Mopria clients must be able to discover the queue on the network. You can provide discovery in either of the following ways:
-
MyQ Mobile Print Agent: use the agent to publish enabled MyQ queues for discovery on the client network.
-
DNS-SD: manually publish MyQ queues using DNS Service Discovery. Use this option when you need DNS-based discovery instead of Mobile Print Agent.
Pull Print and Delegated queues can be made available to mobile devices.
When enabled, the queue is accessible from the MyQ X Mobile Client (iOS and Android) and is broadcast as a discoverable printer for AirPrint (iOS and macOS) and Mopria Print Service (Android).
Only the Job sender user detection method can be used with this queue.
To enable, set Jobs via Mobile Devices to Enabled and click Save.
Both the Mobile Client and AirPrint/Mopria use this setting, but have different infrastructure requirements:
-
MyQ X Mobile Client: requires the Mobile Client app to be installed on the user's device. No additional server-side components are needed beyond this queue setting.
-
AirPrint and Mopria: requires MyQ Mobile Print Agent to be installed, running, and connected to the MyQ server. The agent broadcasts enabled queues for discovery on the local network.
Pull Print and Delegated queues are displayed as available printers on the user's device.
Jobs via RAW Protocol
The RAW protocol is the default protocol for systems that do not use Windows OS and for standard TCP/IP. The advantage of this protocol is that it sends data without further processing and has smaller packet headers.
As RAW comes without any job metadata, you must use a different port for each queue (starting from port 9100). The used ports are added to Windows Firewall.
Click +Add next to Port and select a port.
Make sure that the queue has the following settings:
-
User detection method: Select User detection from PJL, MyQ Desktop Client or Detect user from the job name
-
If User detection from PJL is selected, +Add the desired PJL variable(s) and regular expression(s)
Because there are no metadata, the queue is determined by the TCP port, the user always from the PJL and the sending computer is the client's IP address.
Jobs via Hot Folder
In this section, you can associate the queue with one or multiple network folders where print jobs are stored.
If the folder is password protected, MyQ will use the credentials of the account MyQ service is running under.
The MyQ server will regularly monitor the network folder for new files. If there is new job in the folder, the MyQ server checks if it is supported for printing. Supported files will be downloaded and deleted from the folder, unsupported files will be deleted. The operation is logged in the MyQ log, for example:
"job 123.prn was downloaded from \\serverXYZ\folder1"
"job 123.cpr was deleted from \\serverXYZ\folder1, file type is not supported"
-
Directly supported files: .prn, .pcl, .ps, .eps, .pdf, .jpg, .bmp, .tif, .png, .txt
-
MS Office files are supported, but they are converted to PDF: .doc, .docx, .xls, .xlsx, .ppt, .pptx, .odt, .ods, .odp
-
Files must be copied to the hot folder using standard SMB protocol or MyQ will not detect them.
Only the following user detection methods can be used: Job sender, Detect user from the job name, User detection from PJL.
Click +Add next to Hot folder and type the folder path.
Jobs via MS Universal Print
In this section, you can associate the queue with MS Universal print.
To do that, set the option to Enabled, and click Save. After a few minutes, your queue will be available as a virtual printer in MS Azure Universal Print.