One of the essential MyQ functions is to identify the owner of a sent print job. You can select from a number of identification options. The most common way is to identify the user as the OS account where the job was sent from (Job sender). If there are many users who send their jobs from one account, you can use one of the three authentication options: prompt for a PIN/card, prompt for a username and password or prompt the user to select from a list.
Apart from the above-mentioned options, MyQ offers several advanced identification options that can be used in special cases, such as if you want to use a DNS server to identify the user's computer or detect the user from the job name.
The available user detection methods are described in the sections below.
Job Sender
The basic and most common user detection method option is to identify the owner as the OS user account where the job was sent from.
If the user logs on the account Eliot.Kate and sends the job from there, MyQ identifies them as Eliot.Kate.
Sender’s Computer Name
With the Sender's computer name option selected, the job owner is identified as the name of the computer where the job is sent from. This way, it does not matter on which OS account the sending user is logged in, and all jobs are accounted on the computer.
By default, the Computer detection method is set to Default mode. This is the standard setting that works in almost all cases. For information about alternative options, please contact your MyQ support.
A regular expression can be used to capture a part of the detected string.
Using a DNS Server to Resolve the Job Owner
With the two user detection method options: Print server's DNS name and Sender's computer DNS name, a DNS server is used to resolve the job owner as one of the two respective values:
-
Print server's DNS name : The computer or server where the print driver is installed. If the DNS server succeeds in resolving the server IP address, the job owner is identified with the server name; otherwise, the job owner is identified with the IP address.
-
Sender's computer DNS name: The computer where the job is sent from. If the DNS server succeeds in resolving the computer IP address, the job owner is identified with the computer name; otherwise, the job owner is identified with the IP address.
The actual value depends on the location where the print driver is installed.
For example: If the print driver is installed on the print server Server 1 and shared with the computer laptop100 where the user prints from, the values are different:
-
When you select the Print server's DNS name method, the job owner is identified with the server, e.g. Server1.domain.com,
-
When you select the Sender's computer DNS name method, the job owner is identified with the computer, e.g. laptop100.domain.com.
If the computer does not use shared drivers but sends the jobs via its own drivers, both values are the same.
A regular expression can be used to capture a part of the detected string.
Detect User from the Job Name
With the Detect user from the job name option, the job owner is identified with the name of the print job. This method can be used in cases where jobs are automatically generated and sent to print by external systems, such as ERP systems. These jobs can have a specific form where the user name is part of the job name, for example user16@documentxy.com.
The Only for LPR user setting is displayed after you select the Detect user from the job name option. This setting allows you to combine the Detect user from the job name method with the Jobs sender identification method. The job owner is first detected as the job sender and only if the username matches the name entered in the Only for LPR user text box, the job owner is identified with the job name.
This advanced user identification method may be required, for example, for some prints from the SAP system. Prints from SAP are usually not sent directly to printing devices, but first to the Windows spooler (SAP LPD or SAP Print) which processes and forwards the prints to the device. This service usually runs under the system account (SYSTEM), and therefore the job sender detected from each such job is SYSTEM. In such cases, you can enter the user SYSTEM in the Only for LPR user text box. MyQ detects the sender and if it is SYSTEM, it identifies the job owner as the job name.
User Detection from PJL
With the User detection from PJL identification option, MyQ detects the job owner from one of the command lines of the print job's PJL header.
To select the line that is used for the definition of the job owner, click +Add and enter the variable (SET USERNAME) in the PJL Variable field. You can enter multiple variable/regex sets by clicking +Add for each one in a new line. MyQ tries to find a PJL line containing the first defined variable, and then eventually repeats the search for the next variable, until it either finds a non-empty value with the definition of the job owner or there are no more variables to search for.
A regular expression can be used to capture a part of the detected string. If no regular expression is specified, the whole string of the PJL variable is used.
Click Edit to modify any existing variables, Test to actually test if your regular expressions work, and X to delete a variable/regex set.
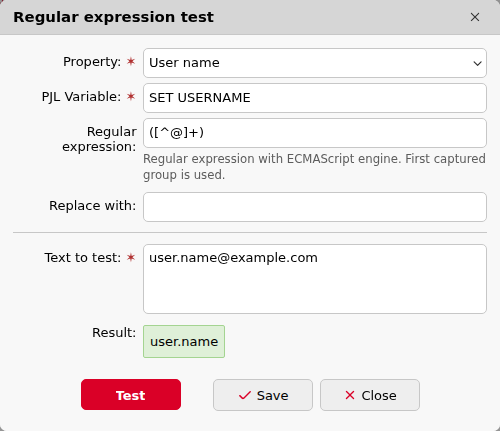
In the below example, you can see how a variable/regex set works, and if it manages to find the user by searching for the username in the email address from the PJL header:
-
In the Text to test field, there should be the text from the print job’s PJL header:
user.name@domain.tld -
In the PJL Variable field, there should be the SET USERNAME variable, or any other variable used to detect the job owner.
-
In the Regular expression field, there should be the regular expression you want to use in order to detect the user name. In the example, the ([^@]+) regex checks if a character is not “@” and uses it, and “+” means to proceed with the next character. The result is that it takes all characters before it reaches “@”.
After clicking Test, the test result is displayed at the bottom. In this example, user.name was successfully detected.