
For most scanning workflows, Easy Scan is the recommended method. Easy Scan is configured as a terminal action and delivers scanned documents to user email, cloud storage, FTP servers, and more, with a single tap on the embedded terminal.
The workflow described on this page applies to those edge cases where Easy Scan is not available – for example, on devices whose native scan panel options are not fully supported by MyQ.
Scan to Me allows users to scan a document from the device's native panel and deliver it to their MyQ account using the device's built-in SMTP client. The device sends the scanned document as an email attachment to the MyQ SMTP server. MyQ receives the job, identifies the sending device, identifies the user currently logged on to that device, and routes the document to the configured destination, which could be the user's primary email address or their scan storage folder.
The destination is determined by the recipient email address used on the device.
Make sure that the time and date are set correctly on the printing device.
Setting up Scanning via Device SMTP
Setup consists of the following steps:
-
Set up scanning on the MyQ server.
-
Set SMTP on the printing device.
-
Set the destinations for MyQ users on the MyQ server.
Set up Scanning on the MyQ server
-
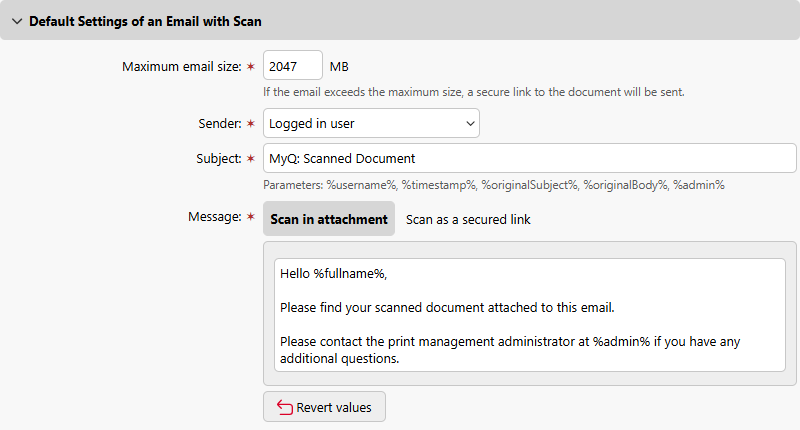
Go to MyQ > Settings > Scanning & OCR and configure the Default Settings of an Email with Scan. The following options are available:
-
Maximum email size: If the email exceeds the maximum size, a secure link to the document will be sent.
-
Sender: The sender of the scan. Available options are:
-
Logged in user
-
Default sender (
MyQ@MyQ.local)
-
-
Subject: Defines the subject line of the email. You can insert valued dynamically using substitution variables:
%username%, %timestamp%, %originalSubject%, %originalBody%, and%admin% -
Message type: You can send the scanned document as an attachment or as a downloadable link. Select Scan in attachment or Scan as a secured link.
-
Message body: Customize the email body.
-
-
Go to MyQ > Settings > Configuration Profiles, open the corresponding profile for the device. On the Terminals tab, make sure that the Set MyQ as device SMTP server option is enabled.
Configure SMTP on the Printing Device
To activate Scan to Me on a device, first enable and configure SMTP in the device web interface. For information about how to access the device web interface and locate the relevant settings, see the printer manual.
Perform the following steps on the printing device's web interface:
-
Enable the SMTP protocol.
-
Enter the MyQ server IP address or hostname as the SMTP server address.
-
Ensure that the SMTP port matches the SMTP port that is configured in MyQ > Settings > Network > MyQ SMTP server. The default port in MyQ is 25.
-
Enter a sender email address. This value is arbitrary.
Set the Destinations for MyQ Users on the MyQ Server
On each user's properties panel, set the appropriate fields according to the following table:
|
Option |
Field |
Value |
|---|---|---|
|
Send scans to the user's primary email |
|
User's primary email address |
|
Store scans in the user's scan folder |
User's storage |
Path to the folder where the document should be stored |
Provide Users with Scan Destinations
To allow users to send scans to the correct MyQ destination from the native scan panel of the device, provide them with the appropriate recipient email addresses:
-
email@domain.local- routes the scan to the user's primary email. -
folder@domain.local- routes the scan to the user's scan storage folder.
You can add these addresses to the device's address book as shortcuts so that users can select them quickly from the native Scan and Send action.