Now that our queues are defined and configured, let’s look at the basic actions that your users must take to print from Windows to a MyQ-configured device. A user will need:
-
The hostname or IP address of the MyQ Print Server
-
The print queue name
-
Their PIN for terminal login
Add a MyQ Print Queue on Windows
Follow this procedure to add a MyQ queue as a local printer on a Windows workstation. You’ll manually add a local printer, with a custom port configuration that points to the queue on your print server.
-
On your Windows computer, go to Settings > Bluetooth & services > Printers & scanners, and click Add device.
Your system scans for available devices. After a few moments, scroll down and click Add a new device manually. -
Select Add a local printer or network printer with manual settings and click Next.
-
In the Choose a printer port step, choose Create a new port and select Standard TCP/IP as the port type. Click Next.
-
In the Type a printer hostname step, enter the hostname or IP address of your Print Server and type a name to identify the port.
Your system tries to detect the port. The Additional port information required screen appears.
-
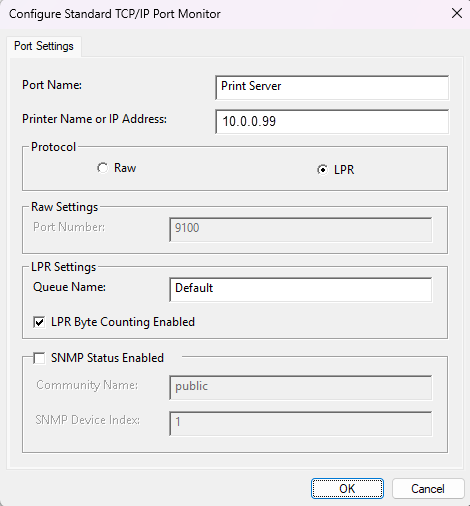
Under Device Type, select Custom and click Settings… The port configuration dialog appears.
-
Fill in these fields with the values shown (some values may be prefilled), and click Next:
-
Port Name: Enter a name that identifies the port.
-
Printer Name or IP Address: Enter the IP address or hostname of your print server.
-
Protocol: Select LPR
-
LPR Settings:
-
Queue Name:
Enter the name of the MyQ queue that you want this printer to point to, case sensitive. -
LPR Byte Counting Enabled: enabled
-
-
-
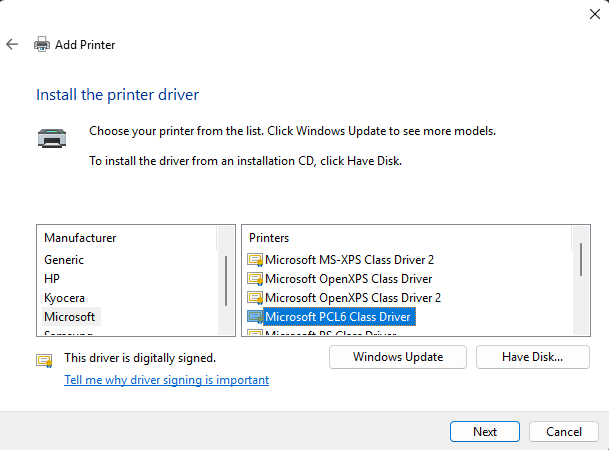
Next, your system installs a driver for the printer. For this quick start example, we will use the Microsoft PCL6 Class Driver.
-
To complete the wizard, give the printer a name and select Do not share this printer.
-
(Optional) Enable Print a Test Page to verify.
-
Click Finish.
Print A Page
On your Windows computer, go to Settings > Bluetooth & devices > Printers & Scanners. Open the device that you added in Add a MyQ Print Queue on Windows, and select Print a Test Page. If you have configured everything correctly, a test print job is sent to the queue on the server.
If you are using a direct print queue, the page immediately comes out of the printer.
If you are using a pull print queue, you can release the job on any printer that is assigned to the queue.
Release a Print Job on the Terminal
If you have configured everything correctly, the user can walk up to any an activated device with embedded terminal support, and log in with their PIN.
On the login screen, users can also choose the language for their terminal session.
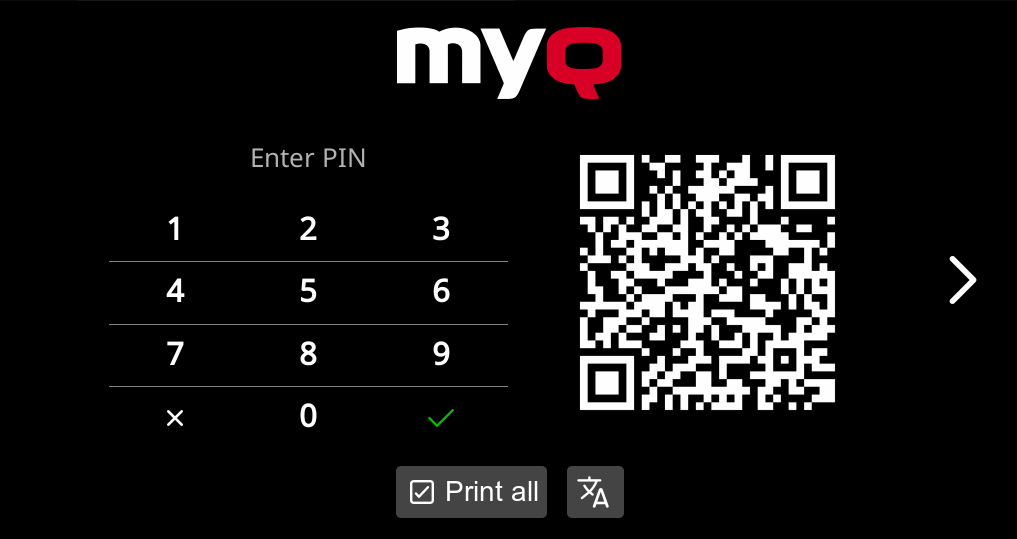
To release your print jobs, tap Print All.
Use an Embedded Terminal Action
Let’s verify that the customized Easy Copy that we configured is working.
Place a color document on the glass and tap Easy Copy action. If everything is configured correctly, the device immediately begins copying in monochrome.
Embedded Terminal: Interactive Showcase
Use this interactive showcase to see what it’s like to use a MyQ embedded terminal. Click Next below to get started.