Installation
The easiest way to install the MyQ Kyocera Embedded terminal is via remote installation from the MyQ Web administrator interface. This method is very simple and it is preferable, especially when you need to install the terminal on a large number of printing devices, since you can install multiple devices in a batch.
You do this by creating separate printer discoveries and adding a configuration profile to any one of them. At the same time, you can assign the discovered printers to a group and/or queue.
Another possibility is to create a remote installation for just one printer and place it in a direct queue.
Before the installation, make sure that the server hostname/IP address in MyQ, Settings, Network is correct. If it’s not, which could happen after a license update or upgrade, the remote setup will fail.

Remote installation via Printer Discovery
Follow the instructions in the MyQ Print Server guide to create and configure a Printer Discovery.
Then, you should create a configuration profile to attach to your Printer Discovery.
The Kyocera section is displayed on the configuration profile’s terminal tab when the Kyocera terminal package is installed on the MyQ server.
Remote installation via manual setup
The terminal is automatically assigned within the remote installation on the MyQ Web Administrator interface, but if you perform a manual installation instead, you have to assign the terminal to the printing device on the device's properties panel on the Printers main tab. This needs to be done for each printing device separately.
Go to MyQ, Printers. The printers overview tab opens.
Right-click on a printer and select Set configuration profile. The set configuration profile window opens.
Select a configuration profile from the drop-down.
Click OK. The profile is added to the properties. You can check it when you right-click the printer and select Properties.
Right-click the printer and select Activate.
Manual installation via USB or a 3rd-party app
Another method of installing an embedded terminal is to upload the installation file from a USB flash drive (or a 3rd-party tool, like Kyocera Net Viewer) and install the application on the printing device system menu and then install the package on the server, assign it to a configuration profile and activate it. This may be convenient if you need to install the terminal to a small number of devices that you have physical access to.
Most printing devices cannot read flash drives formatted in the NTFS file system. Therefore, it might be necessary to use a USB flash drive formatted to FAT32.
To install:
Download the MyQ_Kyocera_Terminal-x.x.x_packages.zip file from the MyQ Community portal.
Extract the .zip file.
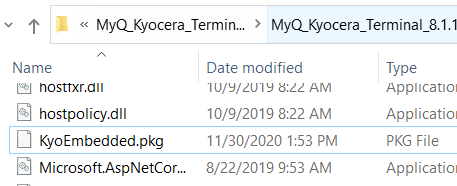
Choose the relevant MyQ_Kyocera_Terminal-x.x.x_.pkg file, change the file's extension from .pkg to .zip, and then extract the .zip file.
Copy the KyoEmbedded.pkg file from the extracted folder to the root directory of the USB drive.

Once copied, delete the KyoEmbedded.pkg file from the packages folder, create the zip file from the other files and change the MyQ_Kyocera_Terminal-x.x.x_.zip file's extension back to MyQ_ Kyocera_Terminal-x.x.x_.pkg.
Install the KyoEmbedded.pkg file to the printing device:
On the device operation panel, press the System menu button (or System Menu/Counter button on some devices). The System Menu opens.
On the System Menu, find and tap Application (Favorites/Application on some devices). You are prompted to login as an administrator.
Login as the administrator. The Application menu (or Favorites/Application menu) opens. (In case you are asked to select between the Local login and the Network login, select Local before entering the credentials).
On the Application menu (or Favorites/Application menu), tap Application. The Application sub-menu opens.
Insert the USB Flash drive with the uploaded installation file, and then tap + (or Add on some devices) at the upper-right corner of the screen. A dialog box appears, informing about the number of applications that can be installed.
Tap OK. The Add-Application menu opens with the MyQ Embedded item displayed. (In case a different version of the terminal is already installed on the device, Update Program is displayed next to the application name. If you update the terminal, its version is changed but all settings are preserved).
Select the MyQ Embedded item, tap Install at the bottom-left corner of the screen, and then tap Yes to confirm the installation. The Completed message appears and the Add - Application menu is empty. You can tap Remove Memory at the bottom of the screen to safely remove your USB flash drive.
Back on the Add-Application menu, tap End.
Activate the application on the terminal:
On the Application menu, select the MyQ Embedded item and tap Menu at the bottom-left corner. The application menu opens.
On the menu, tap Activate, and then tap Yes to confirm the activation. The terminal initial screen opens after a while.

Install and activate the package on the server:
Go to MyQ, Settings, Printers; Under Terminal Packages click +Add and upload the MyQ_Kyocera_Terminal-x.x.x_.pkg package file.
Create a Configuration profile.
Activate the printer (go to MyQ, Printers; Right-click on the printer and click Activate).
.png)