
Administrators can use Microsoft Intune to deploy and configure the MyQ X Mobile Client on managed devices. When deployed this way, server configurations are applied automatically so users do not need to configure the app manually.
Prerequisites
Before you begin, ensure the following:
-
The device is fully enrolled using the Company Portal (CP) app. Download and install the management certificate through the Company Portal.
-
The app is installed using the Company Portal. If the app is installed directly from the Play Store or App Store, MDM configuration profiles will not work.
-
In the Intune devices overview, the device shows as enrolled and compliant.
-
Configuration profiles are applied to groups of devices. Create a group and add the devices you want the profile to apply to.
Add the App to Intune
-
Go to the Intune admin center.
-
Click Apps, then select the platform for your deployment (Android or iOS).
-
Click Create and follow the steps below for your platform:
Android
Follow the steps in the Microsoft documentation: Add and Assign Managed Google Play Apps to Android Enterprise Devices. Once the app appears in the list of Android apps, you can edit the app information and assign user or device groups.
iOS
-
Select iOS Store App.
-
Click Add app and search for MyQ X Mobile Client, then select the app.
-
Click Next and assign user and device groups as required.
-
Click Next again, review the setup to confirm it is correct, and click Create.
The application will be visible to the selected users or devices in the Intune Company Portal app. Users may need to resynchronize with the Company Portal for the app to appear. Administrators can also force a resynchronization of devices from the Intune admin center. Note that this may not be immediate and could take some time.
Create an MDM Configuration Profile
Configuration profiles allow you to push server settings to the app automatically.
-
In the Intune admin center, go to Apps > Configuration.
-
Select Create > Managed devices.
-
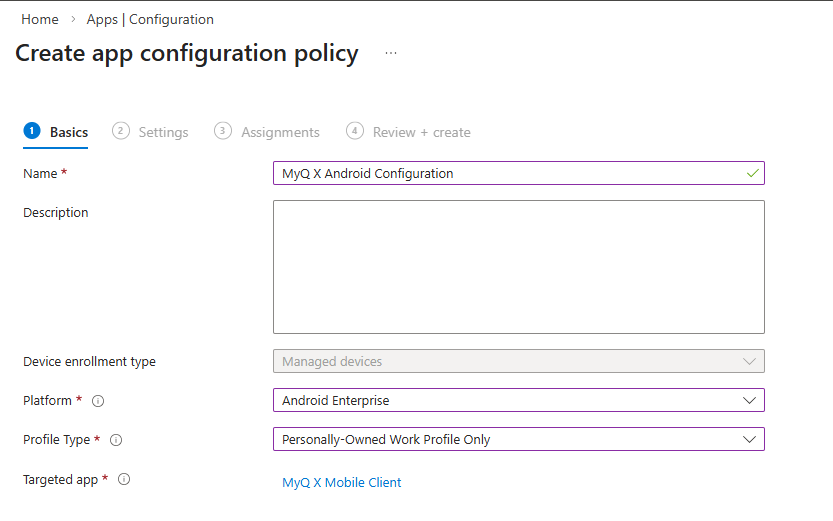
On the Basics tab, define the configuration profile. Set the following values:
-
Name: a name for the profile.
-
Platform: select Android or iOS.
-
Profile type (Android only): select the profile type that your organization uses.
-
Targeted app: for iOS, select the app added as an iOS store app. For Android, select the Managed Google Play store app.
-
-
On the Settings tab, set the configuration parameters for your platform.
-
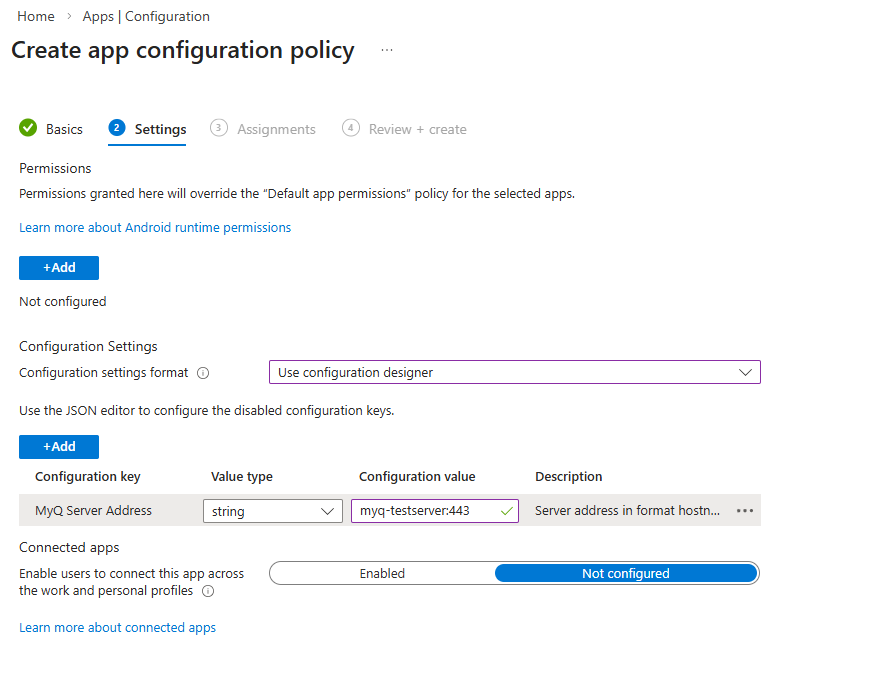
Android: Under Configuration Settings, select Use Configuration Designer. Select Add to open the parameters panel, where you can select from a list of parameters to configure. All parameters have default values that you can change.
-
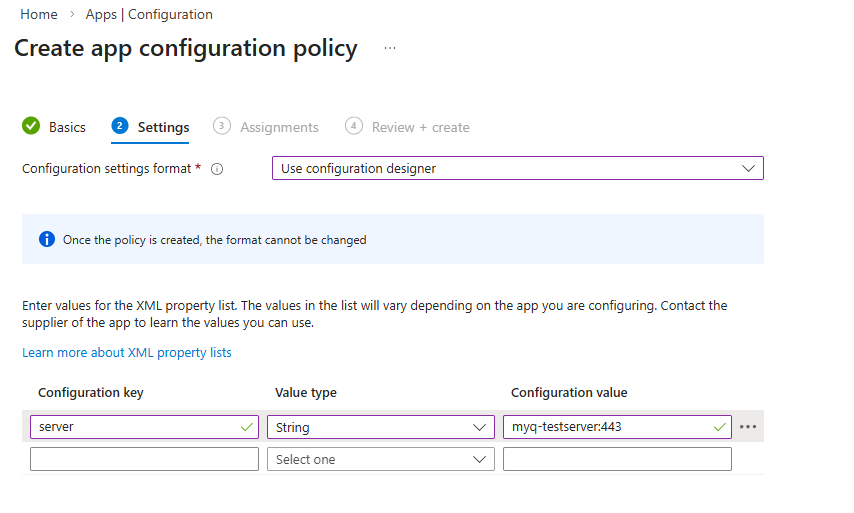
iOS: Select Use Configuration Designer from the dropdown, and add each parameter manually.
-
-
On the Assignments tab, include all device groups you want the profile to apply to.
-
On the Review + create tab, view a summary of your settings and finalize the profile, and click Create when ready. The app will automatically read this configuration on the next launch.
Once created, the server configuration will be set by default in the MyQ X Mobile Client upon the next installation or update of the app.
Supported Configuration Options
You can define one or more MyQ server addresses in the MDM configuration profile. You can also define a Microsoft Application Proxy address.
For server entries, the key name must start with server. Key names are case-insensitive and are processed alphabetically.
The serverproxy key is used specifically for Microsoft Application Proxy configuration.
Server value syntax
Use the following syntax to define server values:
|
Syntax |
Description |
Example |
|---|---|---|
|
|
Defines a MyQ server address. |
|
|
|
Defines a MyQ server address with a user-friendly name. |
|
|
|
Defines multiple server addresses in one value. |
|
If a display name is not defined, the server address is used as the server name.
Android
On Android, use the configuration designer to configure the available parameters. To define multiple server addresses in one value, separate the addresses with a semicolon (;).
Example:
|
Name |
Type |
Value |
|
|
String |
|
iOS
On iOS, add the configuration keys manually.
Option 1: One key with multiple servers
|
Name |
Type |
Value |
|---|---|---|
|
|
String |
|
Option 2: Multiple server keys
You can define multiple keys. Any key name that starts with server is processed alphabetically.
|
Name |
Type |
Value |
|---|---|---|
|
|
String |
|
|
|
String |
|
|
|
String |
|
Option 3: Microsoft Application Proxy
Use the serverproxy key to define a Microsoft Application Proxy address.
|
Name |
Type |
Value |
|---|---|---|
|
|
String |
|