.png)
Gathering Logs for Support
When creating a Helpdesk case ticket, it is necessary to provide the information required to quickly investigate the issue and find a solution. Please, see individual sections with guides on how to obtain and provide the related data. This article describes obtaining logs for troubleshooting various situations.
Upgrade to the latest available version
If you encounter any issues, please check our Release notes which are published in their respective manuals here, where you can find information about fixes made in newer releases. In many cases updating to the latest version will fix your issue.
If you can’t find the information or you are not sure which fix could resolve the issue, consider upgrading MyQ anyway before creating a new Helpdesk ticket. In many cases, bugs found in older versions are already resolved in the latest release.
Helpdesk File
First and foremost, all support requests must be accompanied by the Helpdesk.zip file. This is mandatory and the first step we need to assist you.
This file contains basic logs and system information, without it we cannot assess the issue you are experiencing.
How to generate a Helpdesk File
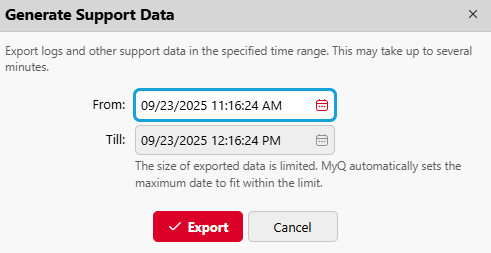
Open MyQ Web UI on the Home page and click on Generate data for support.

Select the appropriate Day and Time when the incident occurred and click Export. Save the file to your desired location.
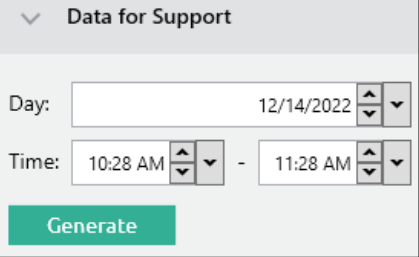
Alternatively, you can generate the Helpdesk file using the Easy Config application.
Navigate to Easy Config > Home > Data for Support. Choose the Day and Time interval and click Generate.
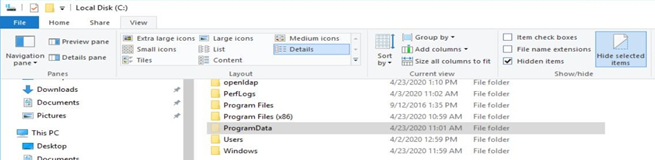
If you are unable to generate the Helpdesk file in the MyQ Web UI or Easy Config, you can still obtain the required logs manually. They can be found in the following directory.
C:\ProgramData\MyQ (By default this folder is hidden, you will have to tick Hidden items under the View tab in Windows Explorer to see the folder).
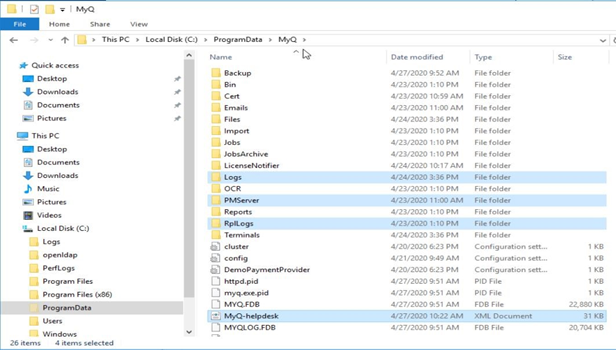
Please include all the highlighted Files and Folders below when logging your support request.
Logs
PMServer
RplLogs
MyQ-helpdesk.xml
Debug Logs
In certain situations, standard logs do not contain the information required to investigation the issue. You can enable enhanced logging that contains more information by turning on the Debug logging mode.
This mode contains more information; however, it is not advised to leave it enabled all the time as the amount of data in the logging database is significantly higher and can impact the performance of the server and drain HDD space quickly.
Navigate to Settings > Log & Audit, enable Log debug level messages, and click Save.

Once debug mode is enabled, replicate the issue and then Generate data for support and attach it to the Helpdesk case.
If the issue cannot be replicated but appears randomly, keep the debug mode enabled in preparation for when the issue re-occurs. Once the issue re-occurs Generate data for support and attach it to the Helpdesk case.
Once the logs are obtained, disable the debug level mode.
MyQ Desktop Client MDC
Support requests regarding MyQ Desktop Client (MDC) should include the Helpdesk file with enabled debug mode, as well as the MDC logs.
You can obtain logs from MDC versions 10.0 and newer simply by right clicking the application logo in the task bar and choosing the command two open the two log folders.
Or manually here:
C:\ProgramData\MyQ\Desktop Client\log
%userprofile%\AppData\Local\MyQ\Desktop Client\log
In version 8.2 the default location for the MDC logs can be found in the following two directories:
C:\ProgramData\SPS\log
%userprofile%\AppData\Local\SmartJobManager
Copy all the folders and files from these two locations, store the data in a .zip archive and attach them to the Helpdesk case.
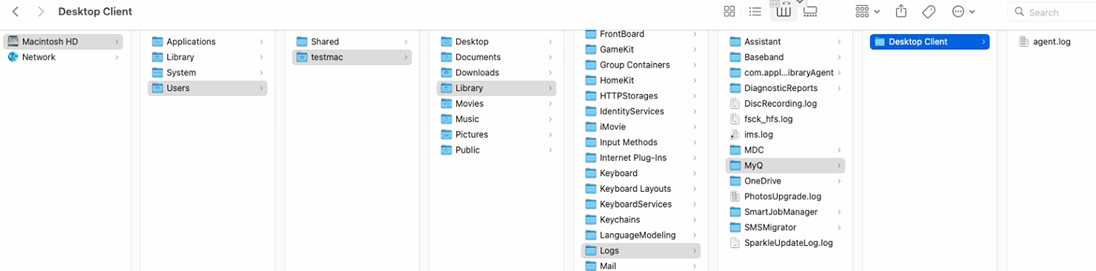
In macOS, the MDC logs are stored in this directory:
Users/[Your_User]/Library/Logs/MyQ/Desktop Client/agent.log
Embedded terminals
All support requests regarding an Embedded Terminal should include the Embedded logs.
For HP, Xerox, Sharp, Toshiba, OKI, and Epson: those logfiles will be part of the package created by Generate data for Support.
They can also be found in \ProgramData\MyQ\Logs\Terminals folder under a subfolder with the relevant brand’s name. Enabling debug logging for MyQ server will also enable debug level logs for terminals.
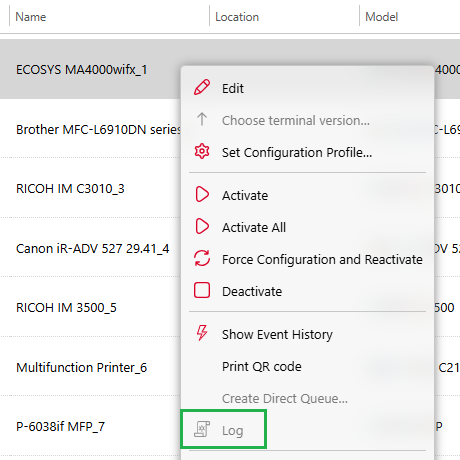
For Kyocera or Ricoh: find the printer in MyQ logo > Printers, right-click the corresponding row and click Logs. This will download the logs from the device and let you save the file.
MyQ Roger
To investigate any issue with MyQ Roger, please specify the Tenant name, Username (email) to whom the issue happened and exact time when it happened, as well as a description of the issue.
You can find the Tenant name in the following places:
In your phone’s app MyQ Roger > More > Profile > Tenant name.
In MyQ Roger Client MRC at the top center.
On the printer by pressing the Roger logo.
If you’re also using the MyQ Roger Client MRC, please provide the logs too.
The default location for the MRC logs can be found in the following two directories:
C:\ProgramData\MyQ\Desktop Client\logs
%userprofile%\AppData\Local\MyQ\Desktop Client\logs
Copy all the folders and files from these two locations, store the data in a .zip archive and attach it to the Helpdesk case.
Wireshark
If you encounter a network-related error in the log or you suspect an issue in the network, attach a Wireshark log to the ticket.
You should also mention IP addresses of affected units such as device(s), Site server(s), SMTP server, etc.
To get the relevant Wireshark log information, follow the steps below.
Download Wireshark from https://www.wireshark.org/ and install it. Keep the installation setup with default values.
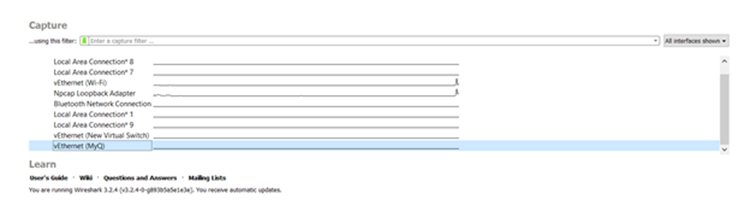
Run Wireshark and by double-clicking, select the adapter on which is MyQ server running the communication.
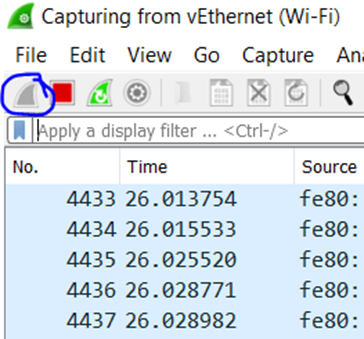
You should see the communication records already filling up the log. If not, click Start capturing packets.
Now repeat the action which caused the error in the MyQ log or wait until the issue/error occurs.
When you successfully reproduce the issue or notice the error, stop capturing packets in Wireshark by clicking the stop (red square) icon.
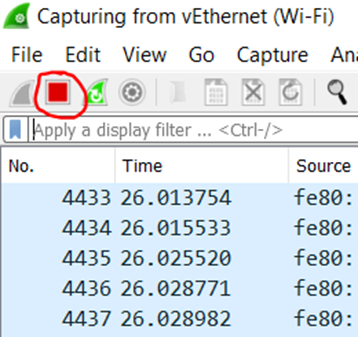
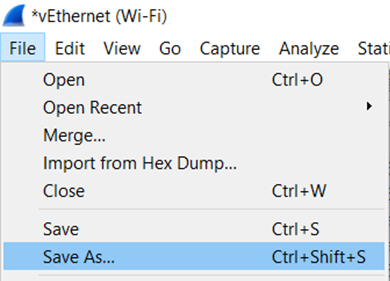
You can now save the file and attach it to the ticket. The file created will have a .pcapng suffix.
Providing a database
In certain cases, it is necessary for the MyQ support team to investigate the database directly. If you are asked to provide the database backup and agree to do so, please follow this procedure.
Please note, that MyQ Solution company will treat the security of the database with utmost care. The database will be kept in safe storage, without the access of external users. It will be deleted as soon as it is no longer required for the investigation. Personal data will not be used in any way.
Backup can be manually created either by using the MyQ web interface or Easy Config.
Web interface
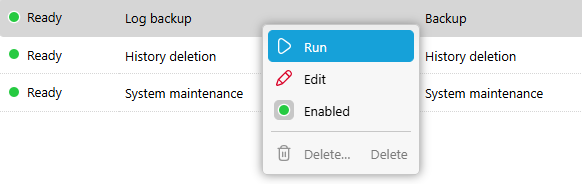
Login as *admin and in Settings > Scheduler run the backup tasks for Database and settings backup.
Check the log to see when the backup operations are finished.
Easy Config
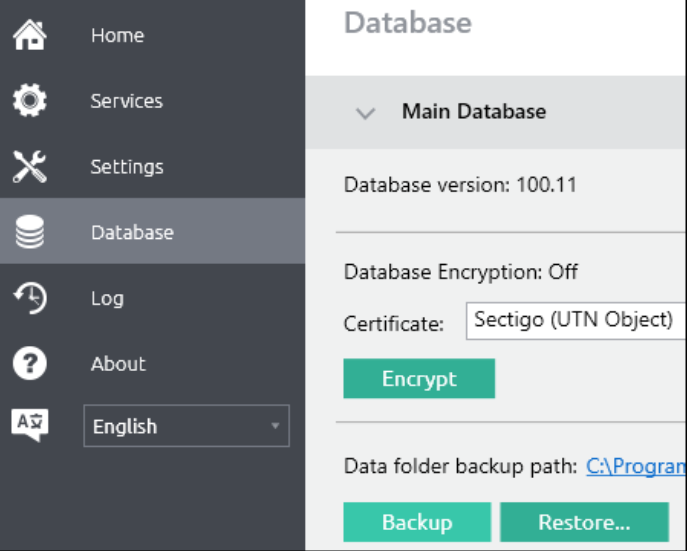
Log in as a user with local administrator privileges on the server running MyQ and run the Easy Config application.
In the Database menu, open the Backup submenu and run the Backup command.
If you are using a Central Server older than 8.2 with a Microsoft SQL database, then it is necessary to create the database backup manually. Use Management Studio or your preferred method to create a .bak file.
Make sure the file is password protected.
MyQ Solution company does not provide online storage, so please use your own preferred online storage to share the database file. It is recommended to send the link separately from the password for security reasons.