Scanning by a single touch. After the user taps this action, the page is immediately scanned to a predefined destination. You can define multiple destinations where the scanned document is sent to, and set scan parameters in MyQ.
For information on how to configure the Easy Scan action and define its destinations and parameters, check Easy Scan settings in the MyQ Print Server guide.
-
If enabled on the server, users can change their scan settings from the terminal screen.
-
You can also create new custom parameters to be used in the scan metadata, or as parts of file names, addresses, subjects and email bodies, and as paths to folders, passwords to folders etc. You can find further details in Create custom parameters on the MyQ Print Server guide.
-
OCR (Optical Character Recognition) can be used with Easy Scan, by creating OCR profiles and enabling users to select them on the embedded terminal. You can find further details in OCR on the MyQ Print Server guide.
-
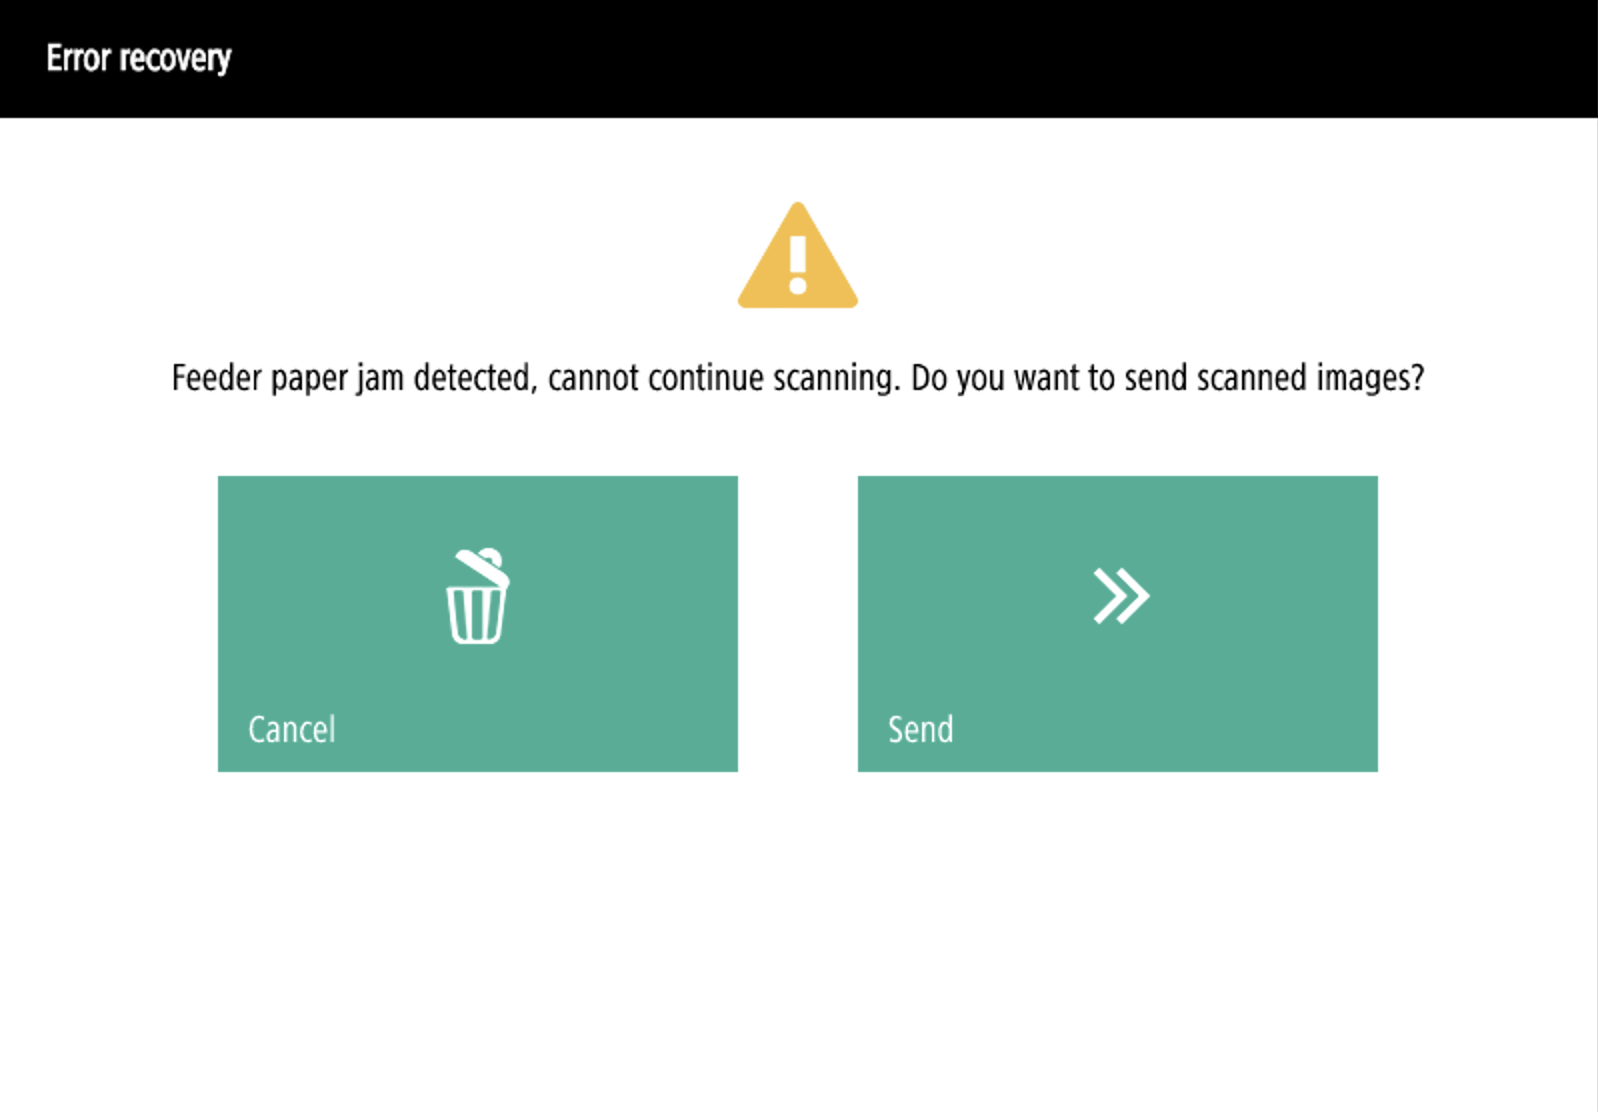
If there is a paper jam during scanning, the “Feeder paper jam detected, cannot continue scanning. Do you want to send scanned images?” error is displayed on the terminal’s screen. You can either tap Cancel to cancel the job, or Send to get the already scanned images.
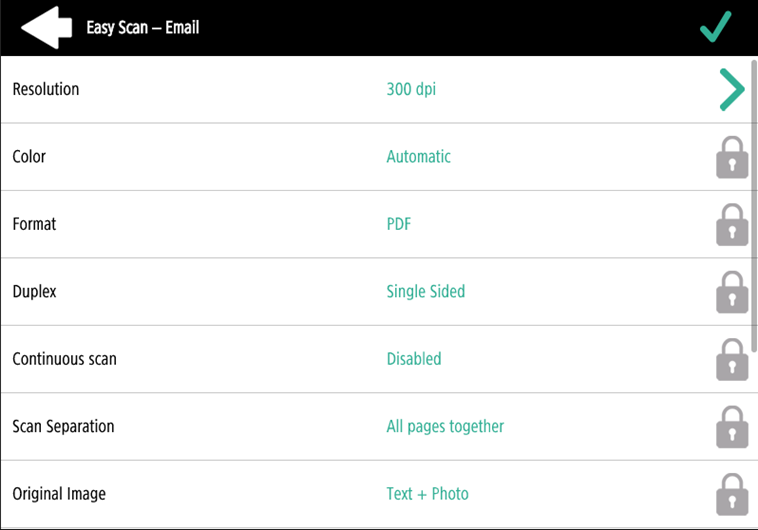
Easy Scan Parameters
Each parameter has a Default option. If selected, the actual values are taken from the default scan settings of the printing device and are displayed on the terminal. If the device’s default values cannot be mapped to the MyQ scan profile value, Default will be displayed.
-
Resolution - The outgoing file's resolution. You can select from the following options:
-
100 dpi
-
200 dpi
-
300 dpi
-
400 dpi
-
600 dpi
-
Default
-
-
Color - The outgoing file's color scale. You can select from the following options:
-
Color
-
Grayscale
-
B&W (two tones) -This is available for the TIFF format only; TIFF is scanned as B&W every time.
-
Automatic
-
Default
-
-
Format - The outgoing file's format. You can select from the following options:
-
PDF
-
JPEG
-
TIFF
-
HCPDF
-
Default
-
-
Duplex - Simplex and Duplex scanning options. You can select from the following:
-
Single Sided
-
Duplex - binding on top
-
Duplex - binding on side
-
Default
-
-
Original Image - Determines the way in which the printing device is going to process the scanned page. You can select from the following options:
-
Text + Photo
-
Photo
-
Text
-
Default
-
-
Original Orientation - Determines the page's orientation in the outgoing file. The paper's position is relative to the person standing at the printing device. You can select from the following options:
-
Top Edge on Top: The page is displayed in a horizontal position (top edge of the page opposite to the person).
-
Top Edge on Left: The page is displayed in a vertical position (top edge of the page on the left-hand side of the person).
-
Default
-
-
Density - The picture's density in the outgoing file. The higher it is, the darker the resulting picture is. You can select from the following options:
-
Lowest
-
Lower
-
Low
-
Normal
-
High
-
Higher
-
Highest
-
Default
-
-
Size - The scanned output's size. This determines the size of the scanning area; therefore it should correspond to the actual size of the scanned paper. You can select from the following options:
-
Automatic
-
A3
-
A4
-
A5
-
A6
-
B4 (JIS-B4)
-
B5 (JIS-B5)
-
Ledger
-
Letter
-
Legal
-
Statement
-
Default
-
-
Mixed size - This parameter enables automatic paper size recognition when different sizes of paper are used during scanning. To be able to use the Mixed size setting, the A4, A3, Ledger or Letter option must be selected in the Size setting. You can select from the following options:
-
On: The Size parameter is ignored, and the size of each scanned image is recognized by the printing device.
-
Off: The Size parameter is used to decide the size of the scanned image.
-
Default
-
-
Continuous scan - With the continuous scan option Enabled, scan jobs are not sent until Done is tapped. After clicking Scan, the printing device scans another page. You can select from the following:
-
Disabled
-
Enabled
-
Default
-
Limitations
-
The XPS format is not supported because of problems with content orientation. The SDK tools either reject the content-adjusted (rotated) images right away or the orientation changes are ignored.
-
Paper size selection - on some devices, if you put a different paper size in the feeder, it will auto-correct according to what was detected. E.g. A4 in the feeder with A5 in settings will result in A4 scan.
-
Booklet scanning is not supported. A4 devices do not support it at all. There is support on A3 devices, but it is not compatible with the way we handle content orientation (which the devices do not support by themselves). Furthermore, the device can only do the "cut" vertically, so for example, an A5 booklet can only be scanned as A4R, which we currently do not support.
-
Paper detection - some devices do not support paper detection on glass. In that case, scanning will be started even if there is no paper present.
-
Mixed size - supported only in "same carrying edge" - all scanned papers must be of the same feeding width. Variable carrying edge is not supported.
-
Blank page detection is not supported.