Manually Create an Azure Application for Entra ID, OneDrive for Business, and SharePoint Online
To give MyQ X the option to access resources in your Azure tenant, such as for user synchronization, or scanning and printing to/from OneDrive for Business and SharePoint Online, you need to register an application in your Azure tenant with sufficient permissions.
You can create multiple different applications for each of the services and not make them visible to users.
However, the most secure and efficient option is to create one application that can be used for all the connectors (Entra ID, OneDrive for Business, SharePoint) and publish this application to all your users. They will see MyQ X as one of their available applications and can access the MyQ Web Interface from My Apps in their Microsoft account.
Microsoft has renamed Azure Active Directory (Azure AD) to Microsoft Entra ID for the following reasons: (1) to communicate the multicloud, multiplatform functionality of the products, (2) to alleviate confusion with Windows Server Active Directory, and (3) to unify the Microsoft Entra product family. Read https://learn.microsoft.com/en-us/azure/active-directory/fundamentals/new-name for details.
Configure App registration for MyQ X
If you have already created an application for MyQ during previous deployments, you do not need to add a new App registration. You can use the existing application and only update its settings, branding and permissions.
Create or Update App registration
Log in to the Microsoft Azure Portal and go to App registrations.

Select New registration to create a new application, or choose an existing application in case you have previously created an application for MyQ X, and you only want to update it.
Set the following details:
Name: MyQ X.
Supported account types: select depending on the target audience
Select Accounts in this organizational directory only ({Tenant name} only - Single tenant) option if all your users who will be accessing this application are members of your Azure tenant.
Accounts in any organizational directory (Any Microsoft Entra ID tenant - Multitenant) can also be used if you will be sharing this application across multiple tenants.
You can skip the Redirect URI settings for now (described in Step 6).
Click Register to create the application. A detail of your newly created application will open.
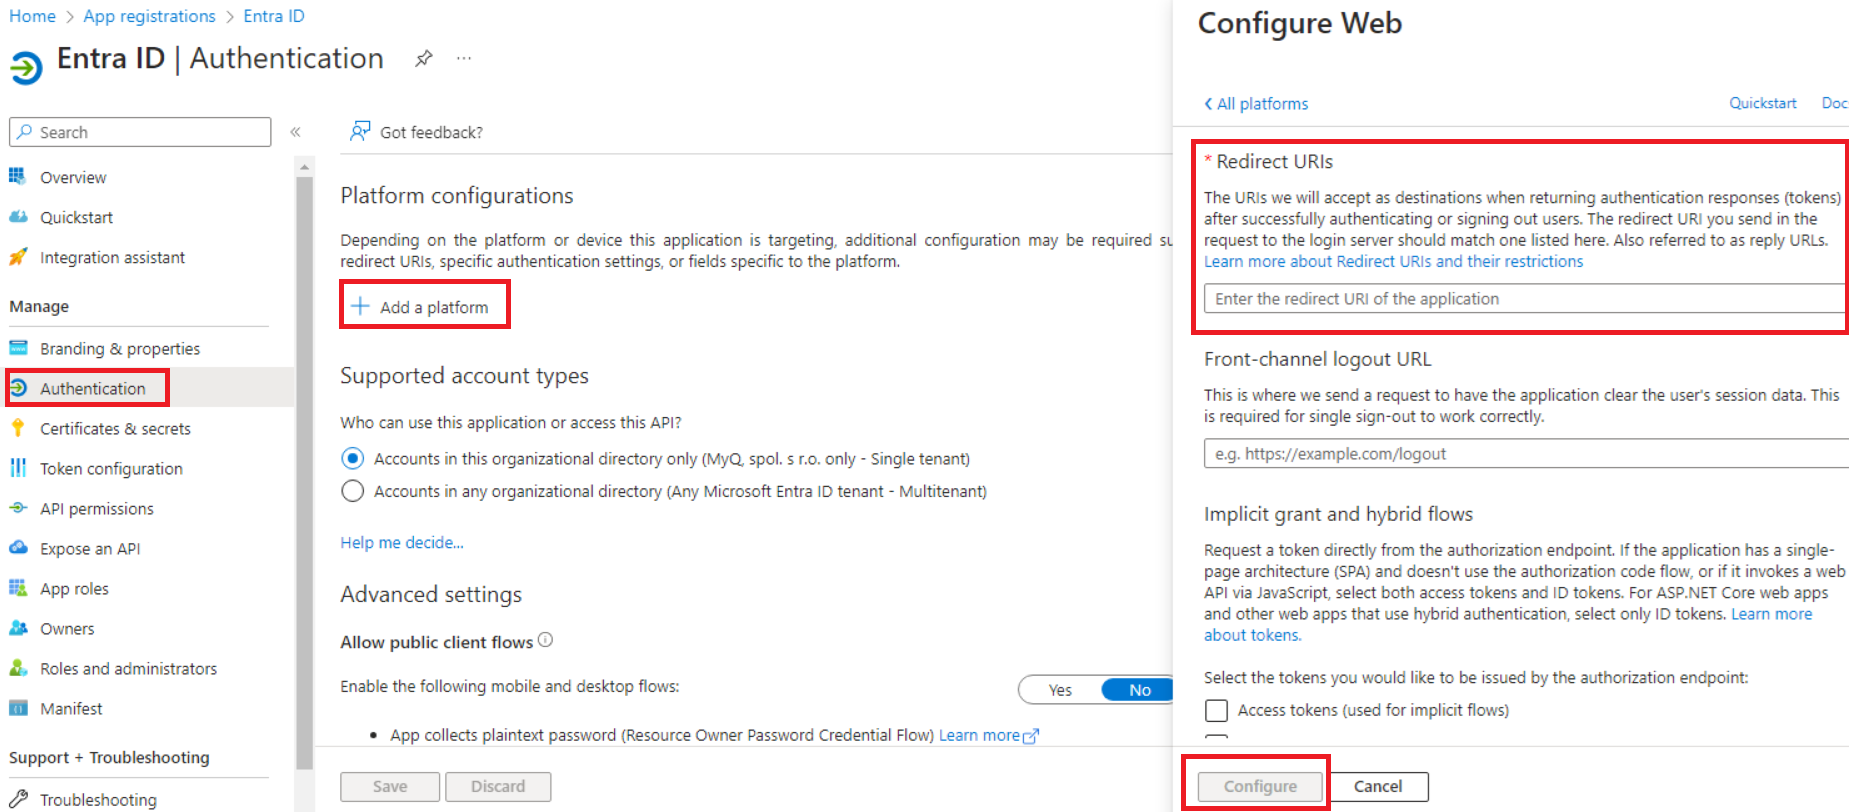
Go to the Authentication settings, and under Platform configurations, click Add a platform.
Select Web, and list all redirect URLs for your Microsoft Entra ID application.
For the URLs, fill in the URL(s) on which your MyQ’s server Web User Interface is accessible in the following format:
https://{hostname:port}/auth(i.e. https://print.acme.com/auth).Click Configure.

List all URLs to MyQ Web Interfaces of all your MyQ servers (Standalone, Central, or site servers) for which you will be using this application for Entra ID connectors.
In the application’s Overview page, save the Application (client) ID and the Directory (tenant) ID, as they are needed for the MyQ configuration.
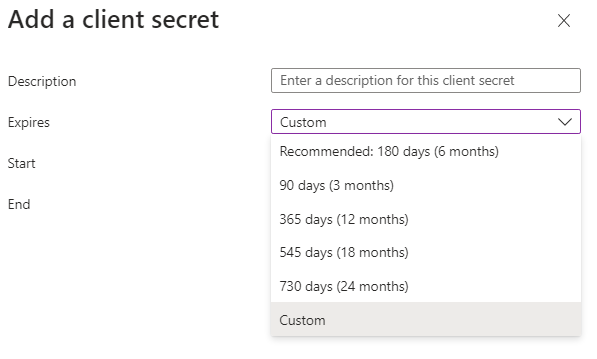
Click Add a certificate or secret next to Client credentials and complete the following steps:

Click New client secret.
Add a Description.
Set the expiration for the key.
Click Add.
Save the client secret key Value, because you need it for the configuration in MyQ and you cannot retrieve it later.
Configure MyQ X branding for the application
On the application’s Properties&branding page, adjust the following:
Name: should be configured as MyQ X from the previous steps.
Upload new logo: select the MyQ X logo downloaded earlier.
Home page URL: provide the link the application will be pointing at when users click it in the My Apps portal, the options are:
use the URL of the MyQ Web Interface of your Standalone or Site server (if this application will be used only by one site) or the Central Server.
use the MyQ’s website: https://myq-solution.com.
fill in the URL of your Intranet site from which users can continue to MyQ X (optional).
Terms of service URL: Policies & Legal Documents | MyQ Solution | MyQ (myq-solution.com).
Privacy statement URL: Policies & Legal Documents | MyQ Solution | MyQ (myq-solution.com).
Click Save.
MyQ X application visibility in the My Apps portal
Make the MyQ X application visible to users in My Apps
On the Azure Portal, type Enterprise applications in the search box, and open this section.
Find the application (i.e. MyQ X) you created previously in App registrations.
On the Properties page, configure the following:
Enabled for users to sign-in?: No
Visible to users?: Yes
Even here, you can configure the application’s Logo (you can find it above in the Configure MyQ X branding for the application section of this article.
Click Save.
The application will be visible to your users in their My Apps portal. When they click it, they will be pointed to the URL defined in the Homepage URL.
Hide the MyQ X application from users
On Azure Portal, type Enterprise applications in the search box, and open this section.
Find the application you created previously in App registrations.
On the Properties page, configure the following:
Enabled for users to sign-in?: No
Visible to users?: No
Click Save.
The application will not be visible to your users in their My Apps portal.
Update application permissions for specific services
You can now give this application permission to read users in your tenant for Entra ID synchronization, and for accessing OneDrive for Business and SharePoint Online in your MyQ X environment.
For Entra ID user synchronization and authentication
From the application’s Overview screen, go to API Permissions and click Add a new permission:
Select Microsoft Graph API and the type of permission (Delegated or Application).
Add the following permissions:Microsoft Graph – Application:
Group.Read.All.Microsoft Graph – Application:
User.Read.All.(Microsoft Graph – Delegated:
User.Readpermission is added by default).
Use Grant admin consent for {Directory name} to set the status of the permissions as "Granted". This needs to be set on all permissions that require Admin consent.
For OneDrive for Business
Go to the Authentication settings, and under Platform configurations, click Add a platform.
In the Redirect URI box, choose Web and add
https://helper.myq.cz/.
On the API Permissions page, click Add a permission. The Request API permissions pane appears. Add the following permissions:
Microsoft Graph – Delegated/Application:
Files.ReadWrite(read more info below).Microsoft Graph – Delegated:
User.Read(this permission is added by default and is non-editable).
Delegated or Application type permissions
The type of permission, “Delegated” or “Application”, depends on whether you want to automatically connect all your users with their OneDrive for Business or prompt the user to connect their accounts manually.
For automatic setup, select “Application” permission.
For manual connection by individual users, select “Delegated” permission.
If you select the “Application” permission, and you want to connect users automatically without their participation, enable the option “Application has access to OneDrive Business of all users” when creating the OneDrive for Business connector in the MyQ X’s Settings – Connections.
Use Grant admin consent for {Directory name} to set the status of the permissions as "Granted". This needs to be set on all permissions that require Admin consent.
For SharePoint Online
Go to the Authentication settings, and under Platform configurations, click Add a platform.
In the Redirect URI box, choose Web and add
https://helper.myq.cz/.
On the API Permissions page, click Add a permission. The Request API permissions pane appears. Add the following permissions:
Microsoft Graph – Delegated - or - Application:
Sites.Read.All(read more info below).Microsoft Graph – Delegated - or - Application:
Sites.ReadWrite.All(read more info below).Microsoft Graph – Delegated:
User.Read(this permission is added by default and is non-editable).
Delegated or Application type permissions
The type of permission, “Delegated” or “Application”, depends on whether you want to automatically connect all your users with their SharePoint Online or require the user to connect their accounts manually.
For automatic setup, select “Application” permission
For manual connection by individual users, select “Delegated” permission
If you select the “Application” permission, and you want to connect users automatically without their participation, enable the option “Application has access to SharePoint Online of all users” when creating the SharePoint Online connector in Settings – Connections.
Use Grant admin consent for {Directory name} to set the status of the permissions as "Granted". This needs to be set on all permissions that require Admin consent.
Configuration in MyQ
With the application created, branded (optional), published for visibility (optional), and updated with required permissions regarding the services you will be using, you can continue connecting the application to MyQ X.
Connect MyQ X to Microsoft services
Read more to find out how to create:
Entra ID synchronization and Sign with Microsoft
This Microsoft Entra ID connector can now be used to configure user synchronization and authentication, continue to the following manuals:
Adding a Microsoft Entra ID authentication server in MyQ, Settings, Authentication Servers.
Adding a Microsoft Entra ID synchronization source in MyQ, Settings, User Synchronization.
You can start with Step 2, adding a synchronization source, as during this process you will also create an Entra ID authentication server.
Easy Scan and Easy Print with OneDrive for Business
You can add a connection for OneDrive for Business to have this storage available in your Terminal Actions (Easy Print and Easy Scan) as a source/destination for print and scanning, respectively.
Continue to:
Add OneDrive for Business connection in MyQ, Settings, Connections
Create Easy Scan action to OneDrive for Business in Settings, Terminal Actions
Create Easy Print action from OneDrive for Business in Settings, Terminal Actions
Easy Scan and Easy Print with SharePoint Online
You can add a connection for SharePoint Online to have this storage available in your Terminal Actions (Easy Print and Easy Scan) as a source/destination for print and scanning, respectively.
Continue to:
Add SharePoint Online connection in MyQ, Settings, Connections
Create Easy Scan action to SharePoint Online in Settings, Terminal Actions
Create Easy Print action from SharePoint Online in Settings, Terminal Actions
.png)
