.png)
Editing Quotas
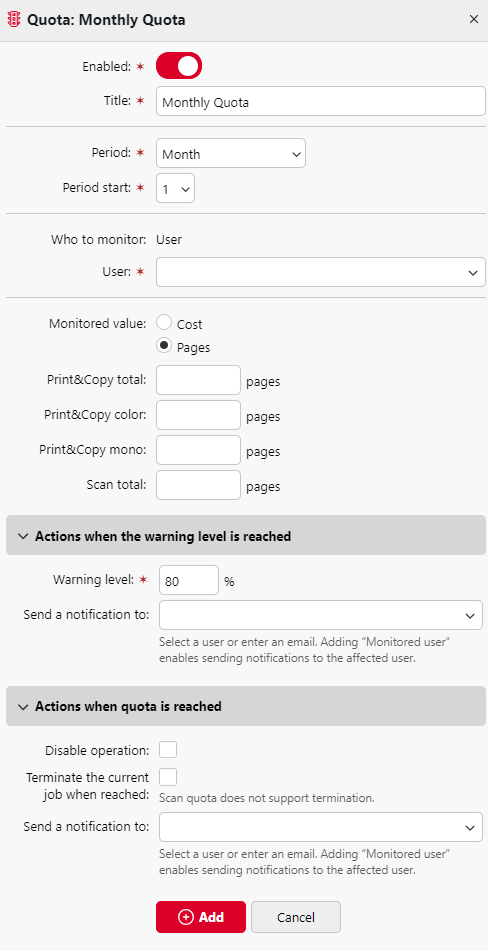
The quota properties panel opens immediately after a new quota is created. To open an already existing quota, double-click on it on the list on the Quota main tab (MyQ, Quota). After you set the properties, click Save to submit the changes.
Each quota has the following set of properties:
Basic settings: enabling and naming the quota
Each quota is enabled by default. To disable or re-enable it, click the Enabled button.
Enter the name in the Title text box.
Time period
In the Period list, select the reset period of the quota (Day, Week, Month, Quarter, Half year, Year, Last X days). The default period is Month. The Last X days period counts the number of pages or the overall cost over the last X days. For example, if the quota is 10 pages over three days and the user printed 5 pages the day before yesterday and two pages yesterday, they can print up to three pages today.
In the Period start list, select the date when the period starts for the Month, Quarter, Half year and Year Period, day of the week for the Week Period or the number of days for the Last X days Period.
If you choose the Day Period, you must also set a time at the Reset quota at field.
Monitored users or groups
In this section you can specify the monitored User, User Group, or Accounting Group, based on the selection you made when creating the quota.
Monitored value
If you select Cost as the Monitored value, the quota is counted in amount of money spent.
Set the quota cost Limit
If you select Pages as the Monitored value, the quota is counted in the amount of printed, copied and/or scanned pages.
Set the Print&Copy total, Print&Copy color, Print&Copy mono (supported by terminals 8.1 or newer) and Scan total in pages.
If the monitored value is set to 0, this operation is effectively disabled for this quota. For example, if the Print&Copy color pages value is set to 0, no color pages can be printed or copied within this quota. Correspondingly, no email notifications will be sent stating that this quota limit is reached.
Actions taken when the warning level is reached
Enter the warning level (in %) in the Warning level text box.
Select the user/s, user group/s, or accounting group/s you want to be notified when the Warning level is reached in the Send a notification to combo box. You can also type an email address to notify into this box. By default, this is the Monitored User.
Actions taken when the quota is reached
You can disable one or more operations after the quota is reached or exceeded.
If the Monitored value is Cost, select them under Disable operations. The options are Print, Copy, Color print (on terminals 8.1 or newer), Color copy (on terminals 8.1 or newer), and Scan.
If the Monitored value is Pages, mark the Disable operation checkbox and the operation that has reached the limit will be disabled.
Mark the Terminate the current job when reached checkbox if you want to interrupt the current job when the quota is reached. If both Disable operation and Terminate the current job when reached are checked, the job will be interrupted when the quota is reached, and the user will be redirected to the MyQ home screen. If Disable operation is checked and Terminate the current job when reached is not, the current job will be finished, and the user will be redirected to the MyQ home screen.
The action is not supported in scan quotas.
If you want to notify someone after the quota is reached, select the user/s, user group/s, or accounting group/s in the Send a notification to combo box. You can also type an email address to notify into this box. By default, this is the Monitored User.