.png)
Printer Provisioning
Installing printers and print drivers manually can be tedious, especially if you are setting up print for a whole department or an entire company. You need to not only prepare the correct drivers for the devices that you have in your environment, but then you must install system-compatible printers on each computer, then install print drivers, and test if everything works as intended.
Printer provisioning allows you to always deliver the right printers to your users. Together with features such as Printer Discovery and Desktop Client configuration profiles, the entire process can be largely automated:
Install and Update Printers in Domain Environments.
Install and Update Printers for BYOD Devices.
Provision printers to Windows and macOS client computers.
Update Available Printers as needed.
Terminology Change!
The term for a group of print drivers and their settings, as it is stored in the MyQ driver store, is now known as a print driver set (previously, we used the term print driver configuration profile). This terminology change is in progress, but until all components have released their relevant updates, inconsistency of these terms may appear in the documentation and product user interface.
Set up Printer Provisioning
Setting up printer provisioning has these main stages:
Deploy Desktop Client
Deploy Desktop Client to all client computers where you want to use printer provisioning.Prepare and Capture Template Printers
Install print drivers on a single client machine, assign them to printers, and configure them as you would manually. Then use Desktop Client to create print driver sets and upload your drivers to the MyQ driver store.Assign Print Drivers Sets to Queues, and Deploy
Once your print drivers are stored in the MyQ driver store, you can attach these print driver sets to selected queues. Desktop Client users are then provisioned the correct printers automatically.
Prepare and Capture Template Printers
Install Print Drivers
The first step for this deployment is to collect the print drivers you will want to install and create printers as if you were doing it on a user’s machine. Get these drivers from the manufacturers' download pages.
Recommendations
Use official vendor drivers for each device.
Use device-specific or universal drivers in a traditional mode configured on a physical device.
Universal drivers in dynamic mode might display prompts to the user to search devices on the network. Also, some drivers, e.g. HP Universal Print Driver may not allow for print in color when not configured on a specific model.In a mixed fleet environment, use drivers published for your target devices to achieve the best compatibility. You might be able to print successfully to a device even through a driver of a different manufacturer thanks to MyQ’s cross-vendor printing support, but you will not get all the functionalities of the device.
Create Printers and Assign Print Drivers
Perform these steps on a Windows client machine.
Add your printers as normal.
Go to Control Panel/Settings > Devices & Printers > Add manually.Select the installed driver in the printer’s settings.
Go to Control Panel/Settings > Devices & Printers > Open a printer > Printer properties > Driver, or in the Start menu – search for and open Print Management – Print servers > Printers.Assign a TCP/IP port to the printer
Go to Control Panel/Settings > Devices & Printers > Open a printer > Printer properties > Port, or in the Start menu, search for and open Print Management – Print servers > Printers.
The queue name in the LPR port can be used to automatically attach the print driver set to a queue. If a queue with the same name already exists in MyQ, the profile is automatically assigned to it. This way you can instantly deploy or update the driver without further configuration.
Configure the desired driver capabilities and settings, such as finishing options.
Go to Printer Properties > General > Preferences or Printer Properties > Advanced > Printing Defaults.Test your configuration.
Capture Driver and Settings
Run the Desktop Client on the template computer.
Sign in to the Desktop Client as a user with
AdministratororManage settingsrights.Right-click on the Desktop Client icon and then select Admin Options > Capture drivers.
A dialogue opens with a list of printers.Select printers that are using drivers you want to capture.
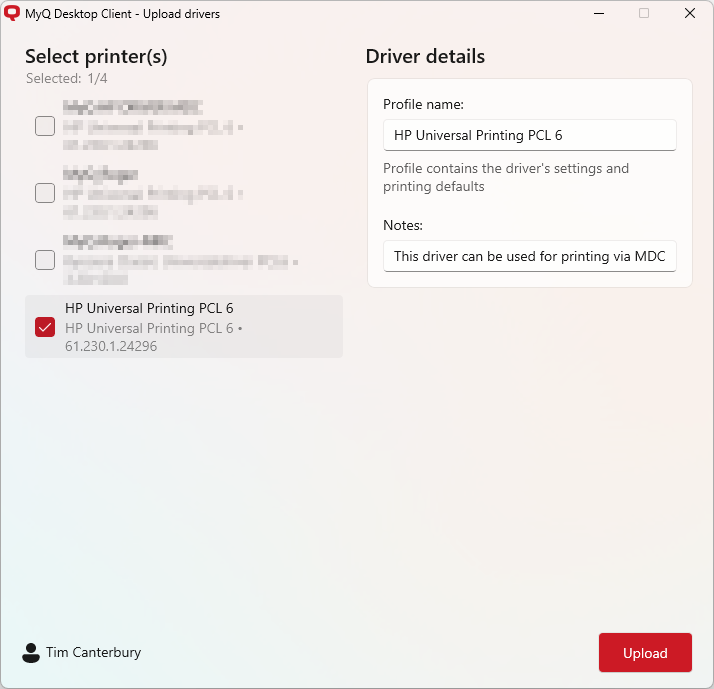
Under Profile name, specify the name of the print driver set; if it does not exist in MyQ already, a new set with this driver will be created. If you specify an existing driver set, the driver will be added to it.
By clicking the printer once, you select it for capture and open the Driver details for this printer. By clicking it again, you deselect this printer. If you select another printer (and select it), clicking another printer once opens its details, click again to deselect it.
Once you select all required printers and specify the print driver sets they should be uploaded in, click Upload. Drivers will be compressed into ZIP files and uploaded to the MyQ Print Server.
When and how are drivers installed?
When the MyQ Desktop Client is running, it is connected to the MyQ Print Server and updates its configuration from time to time. When you make any changes to the configuration profile, including changes to print driver sets, the Desktop Client reacts and updates the printers at the next available opportunity.
Whether the print queue will be deployed on a particular computer depends on the following:
Is the computer IP address within the range defined in the Desktop Client’s configuration profile? Or does the computer hostname match the configuration profile settings? Is printer provisioning for this MDC profile enabled?
Does the user signed in the MyQ Desktop Client have rights to use this queue? Check this in on the Print Server in Queues – queue settings – Rights tab.
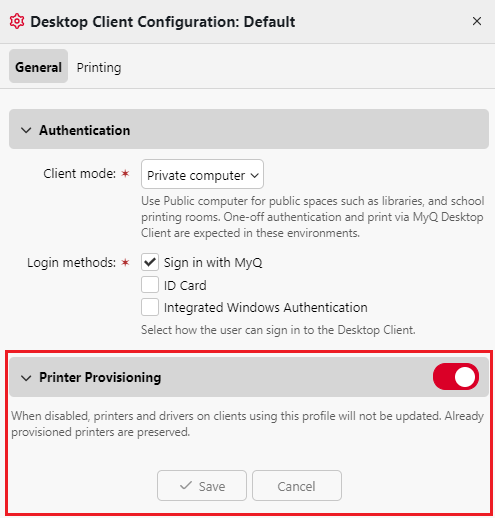
Disable Printer Provisioning
On any selected Desktop Client configuration profile, Printer Provisioning can be disabled. When disabled, printers and drivers on clients using this profile will not be updated. Already provisioned printers are preserved.
This option can be configured in the MyQ Web Interface in Settings, MyQ Desktop Client, by selecting the relevant configuration profile and enabling/disabling Printer Provisioning.
For more information about provisioning and managing driver profiles see Print Drivers Settings in the Print Server Guide.
Limitations
Capture fails to save custom paper format.