.png)
Updating MyQ
The MyQ update to a higher version or reinstalling the same version is performed automatically after running the installation executable file.
Before a MyQ update on Windows Server 2012/2012 R2/2016/2019 (or on Windows 8.1/10), make sure that the latest Windows updates are downloaded and installed on the server.
When upgrading or updating MyQ, ensure all antivirus exclusions are made and that there are no running scan operations on the MyQ directories structure.
It is strongly recommend to backup your database before the update.
To update MyQ:
Run the MyQ software installation executable file. The Select Setup Language dialog box appears.
Select your language, and then click Next. The Setup dialog box appears. It informs you that there is an older version of MyQ and that the installer will start the update process.
Click Yes. The License Agreement dialog box appears.
Select I accept the agreement and click Next.
In the Ready to Install dialog, click Install. The rest of the update process is nearly identical to this of installing MyQ.
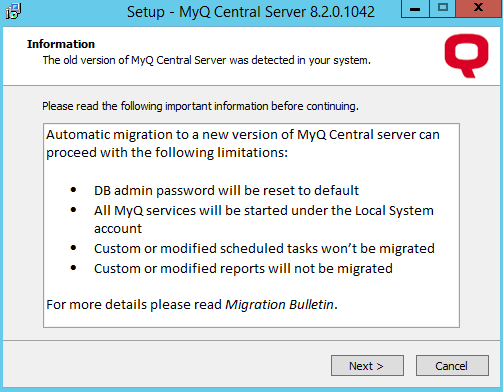
In older MyQ versions, it was possible to switch between a Standalone server, a Site server, or a Central server. This is no longer available, as the MyQ Print server and MyQ Central server are different products and use separate installers. If you have such a setup and plan to upgrade it to MyQ Central server 8.2, be advised that the upgrade will not be successful. It is required to upgrade your system to version 8.1, back up your database, download the latest MyQ Central server installer, and migrate your setup.
Migration Bulletin
Upgrade your system to version 8.1. If you are using an older version, the migration is not possible. It is recommended to update your database to the latest version as well. Back up your database before continuing.
Download and run the MyQ Central Server 8.2 installer.
The migration wizard informs you that the migration is possible, with some limitations. The database administrator password will revert to the default one, masterkey. You can change it after the migration in MyQ Central Server Easy Config. All MyQ Services will run under the Local System account. You can change that after the migration in MyQ Central Server Easy Config. Any custom or modified scheduled tasks are not migrated. You can set them up again after the migration in the Task Scheduler settings tab. Any custom or modified reports are not migrated. You can set them up again in the Reports tab. Click Next to start the migration.
Click Yes in the pop-up confirmation to start the migration.
In the License Agreement dialog, select I accept the agreement and click Next.
In the Options dialog, you can choose to backup your database before the migration starts (selected by default and highly recommended). Click Next.
The Ready to install dialog informs you of your previous options. Click Install.
The migration process begins. First, your database is backed up, then your previous installation is uninstalled, and lastly, the latest version of MyQ Central Server is installed. Click Finish to exit the migration wizard.
MyQ Central Server Easy Config opens, and your database is installed and upgraded automatically. Click Finish once done.
In the Home tab, in the Data migration from the previous Central Server installation section, you can see the progress of the migration, and you can also Pause it.
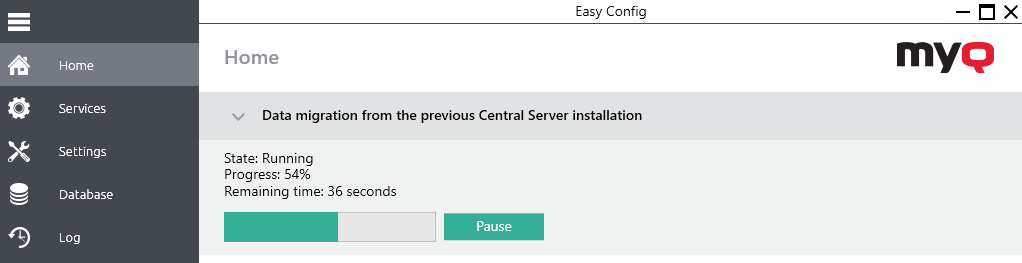
Until the data migration is finished, the following actions are not available:
In MyQ Central Server Easy Config:
Encrypt
Decrypt
Backup
Restore
In MyQ Central Server:
Scheduled Tasks
System Maintenance
Generating Reports
Replication