Authentication Servers Settings
You will need to do configuration in Settings – Authentication Servers if you want to:
Synchronize users from and/or have them authenticate towards an LDAP server, such as local Active Directory domain.
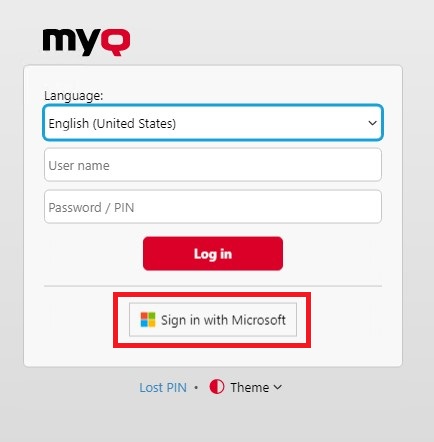
Synchronize users from your Microsoft Entra ID, and use Sign in with Microsoft for the MyQ Web Interface, Mobile, and Desktop Clients.
Authenticate users against a Radius server.
You can later assign the authentication server created here to be used by all synchronized users automatically when you are creating the user synchronization source.
You also can control these settings for each user individually in their profile on the Users page.
If you only authenticate users against MyQ (ID cards, PINs, and passwords), and thus do not use any remote authentication servers, or need to integrate with another external authentication provider, see User Authentication for details.
Limitations
Users using an LDAP, Microsoft Entra ID, or Radius authentication server cannot sign in on the MyQ Web User Interface with a PIN. However, they can use their PIN on the MyQ Embedded terminals and MyQ Desktop Client up to version 10.0.
Adding a new LDAP server:
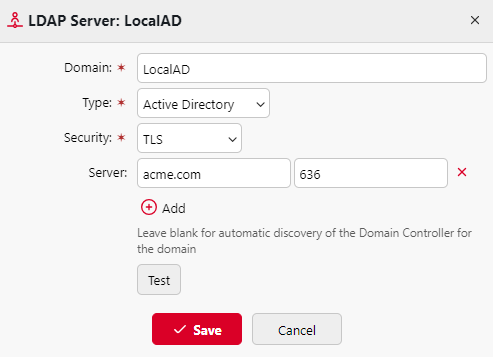
Click +Add and select LDAP Server. The new LDAP server properties panel opens on the right side of the screen.

Enter the LDAP Domain.
Select the LDAP Type as Active Directory or, if required, one of the other LDAP options such as Novell, OpenLDAP, or Lotus Domino.
You should allow the LDAP connection to be secured by selecting the Security protocol you want to use.
For Active Directory, you must select
TLSin the Security field.
Enter the Server hostname and the communication port.
For Active Directory, use the Server port
636for secure communication with TLS. You can also leave the IP address or hostname empty if you do not know them. The server will then be automatically discovered.
If you have more addresses related to one LDAP server, you can add them by clicking Add.
Click Save. The LDAP server now appears on the list of servers.

Adding a new MS Azure Server:
Click +Add and select Entra ID Server. The new Entra ID server properties panel opens on the right side of the screen.
If you have already added Microsoft Entra ID in the Connections settings, the server appears on the list. If not, click Add new, add the Microsoft Entra ID connection first (follow the guide for creating a new Entra ID connector).

If you want your users to be able to log in on the MyQ Web UI via Microsoft single-sign-on, select the Enable Sign in with Microsoft checkbox.

Click Save. The Entra ID Server now appears on the list of servers.
Adding a new Radius server:
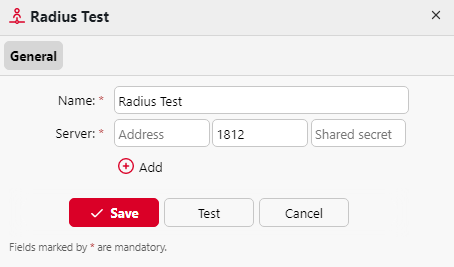
Click +Add and select Radius server. The new Radius server properties panel opens on the right side of the screen.
Enter the Radius server Name.
Enter the Server IP address or hostname, the communication port and the Shared secret.
If you have more addresses related to one Radius server, you can add them by clicking Add.
Click Save. The Radius server now appears on the list of servers.

When an authentication server is renamed, a server with the old name will still appear in the Authentication server settings of a user profile, alongside the server with the new name. The old server is removed after the following user synchronization propagates changes.
.png)