
After your MDP server is configured and trusted on the client machine, configure your MyQ Print Server client to use MDP as its document processing service.
Perform these steps in MyQ Print Server:
-
Add a MyQ Document Processor connection.
-
Configure OCR via MyQ Document Processor.
-
Configure an Easy Scan action to use the OCR Profile.
Add a MyQ Document Processor Connection
-
Go to MyQ > Settings > Connections and click Add.
-
Select MyQ Document Processor.
-
Configure the following fields:
-
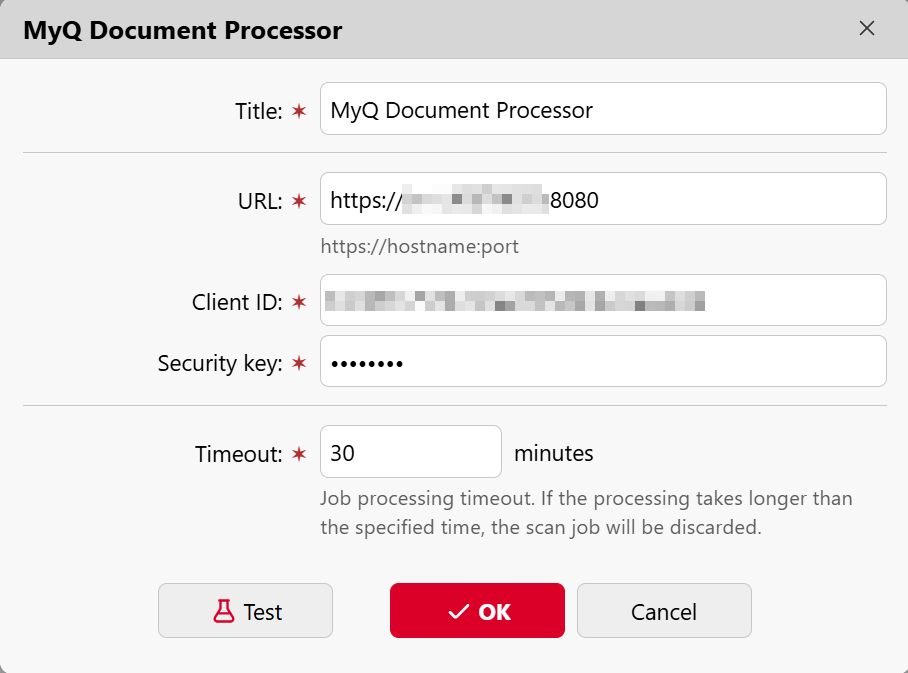
Title: enter a name for the MDP connection.
-
URL: the hostname and port of the MDP server. For example:
https://mdp-server:8080 -
Client ID: the client number configured in the MPD server
-
Security key: the secret that correspond to the client ID.
-
Timeout: The job processing timeout. If processing takes longer than this value, the scan job is discarded. Default: 30 minutes.
-
-
Click Test to verify the connection.
Important: You must use the server hostname in the URL. IP addresses are not
supported.
Configure OCR via MyQ Document Processor
This method uses the MyQ Document Processor service. Before you use this type of profile, first go to Settings > Connections and create a connection to at least one MyQ Document Processor instance.
MyQ Document Processor Settings
-
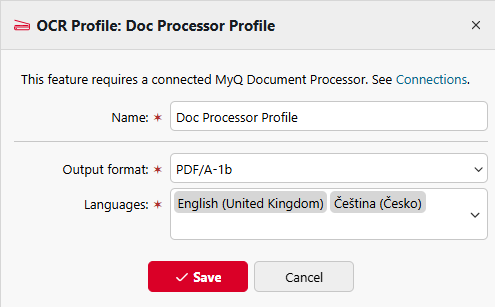
Name: A unique name for the profile. The name appears in the Easy Scan action parameters in the Format option.
-
Output Format: The format of the output document. The following output formats are supported:
-
pdf
-
PDF/A-1b
-
PDF/A-2b
-
PDF/A-3b
-
txt
-
docx
-
xlsx
-
pptx
-
-
Languages: The possible languages of the input document. Selecting the correct languages is critical for character recognition quality.
Notes:
-
If multiple MyQ Document Processor connections are configured, MyQ selects one
at random for each job. -
OCR processing time varies depending on the processing mode, the size of the
document, and the speed of the Document Processor service.
Configure an Easy Scan action to use the OCR Profile
-
Go to MyQ > Settings > Terminal Actions and edit an Easy Scan terminal action.
-
On the Parameters tab, set the Options > Default value to the OCR Profile that you defined.
-
On the Processing tab, set your processing options. The following OCR processing features are available:
-
Separate Pages
-
Split every N pages
-
Split on barcode/QR code
-
Group pages by matching barcode/QR code
-
-
Skip Blank Pages
-
-
Save the Easy Scan terminal action.