Printing from email setup
Once the Jobs via Email option is enabled, the users can print a document by attaching it to an email and sending it to a special email account dedicated to print. Jobs send via email are limited to 500MB per email message, all attachments included.

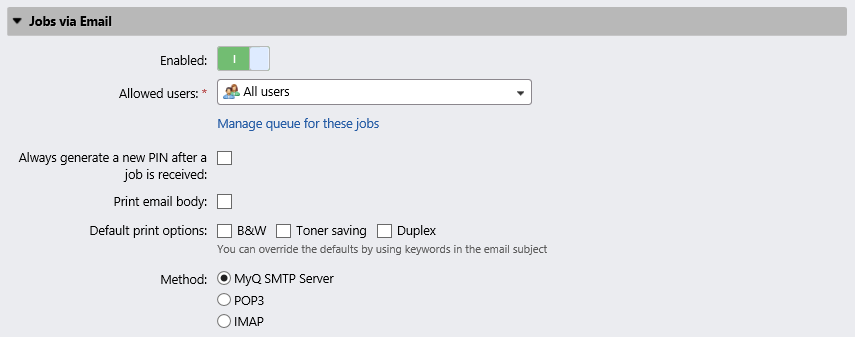
If you select the Always generate a new PIN after a job is received option, a new PIN is generated every time a user sends an email with a print job. If the user already has a PIN, it is replaced by the new one. If you select this option, make sure that you select the Send new PIN via email option on the Users settings menu, under PIN. Otherwise users do not receive the new PIN and cannot access their MyQ accounts.
You can enable users to Print email body and restrict the print to B&W, Toner saving and/or Duplex mode by selecting one or more Default print options.
In addition, users can change their print job parameters by adding keywords to the email subject. These changes have priority over the Default print options selected in MyQ. Users can choose from the following keywords: #color (color print), #mono (monochrome print), #duplex (print on both sides of a paper), #simplex (print on one side of a paper), #ecoon (toner saving print mode on), #ecooff (toner saving print mode off). They can be used as any part of the subject and do not have to be separated. For example, an email with the MyPrintJob #mono#duplex subject will force the job to be printed in monochrome and duplex.
There are two ways of receiving the print jobs sent via emails: you can either use MyQ as an SMTP server and forward all emails with the print jobs there, or you can use MyQ as an email client that fetches all emails from a specific email account on your server via the POP3 or IMAP protocol.
Forwarding emails to the MyQ SMTP server
With this option, MyQ listens on the MyQ SMTP server port set on the Network settings tab and receives any email starting with print as the email with the print job. If you select this option, you need to take the following steps:
On your company mail server, create an email account for receiving print jobs.
Redirect the sent emails from this address to print@[IP/hostname], where IP/hostname is either the IP address of MyQ server, or its hostname. Any email received on this address will be processed as a print job and its owner will be identified by their email address.
Receiving print jobs via POP3 or IMAP
On your company mail server, create an email account for receiving print jobs.
On the Jobs settings tab of the MyQ Web Interface, under Jobs via Email:
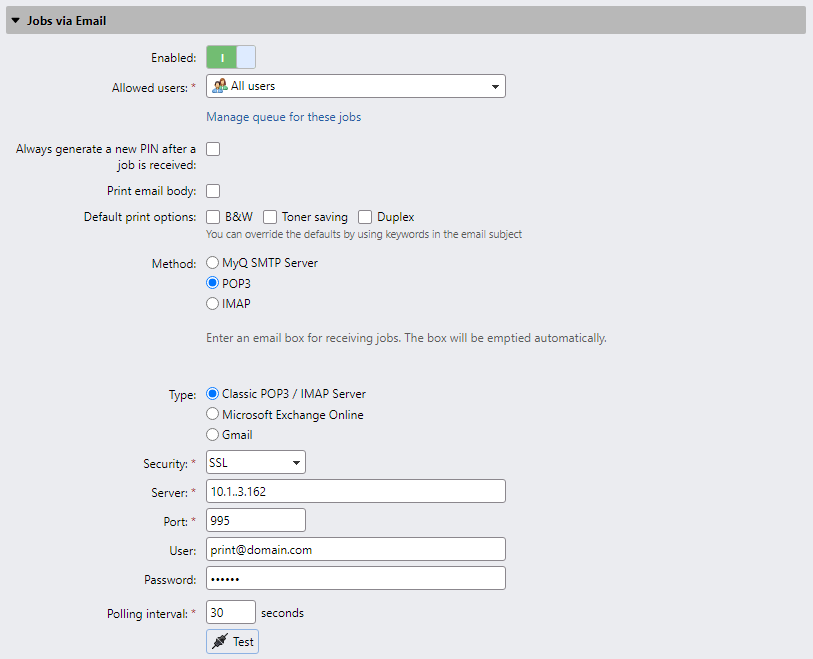
Under Method, select the protocol that you want to use.
Select a type from Classic POP3/IMAP Server, Microsoft Exchange Online or Gmail.
For Classic POP3/IMAP Server:
Ensure that the protocol port is correctly set in the Port text box.
If you want to secure the communication between MyQ and the mail server, select one of the security options (SSL, STARTTLS).
Enter the IP address or the hostname of the mail server in the Server text box.
Enter the address of the email account that will receive the print jobs in the User text box.
Enter the password of the email account in the Password text box.
By changing the value of the Polling interval setting, you can change the interval after which MyQ fetches new emails from the mail server.
By clicking Test, you can test the connection to the mail server, and then click Save to save your changes.

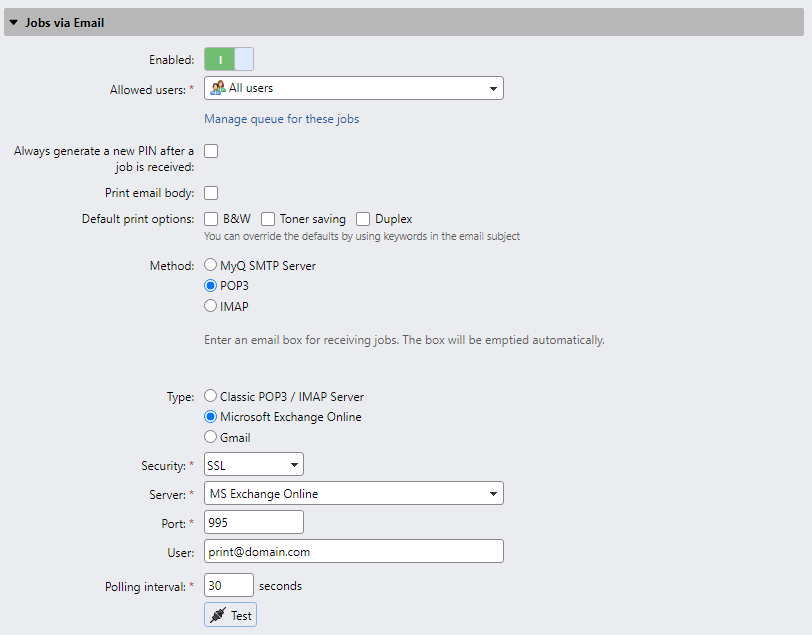
For Microsoft Exchange Online:
If you have already set up a Microsoft Exchange Online server in the External Systems settings, that server is selected in the Server field. If not, you can click on the Server field and then click Add to add your Microsoft Exchange Online server. In the pop-up, add a Title for your server, the Client ID and the Tenant ID, and click OK. For more information, check Microsoft Exchange Online Setup.
Set the Port setting to the correct value that the email server listens to. You can find the default Microsoft settings here https://support.microsoft.com/en-us/office/pop-imap-and-smtp-settings-8361e398-8af4-4e97-b147-6c6c4ac95353 .
Choose between the SSL and STARTTLS Security options.
Enter the address of the email account that will receive the print jobs in the User text box.
By changing the value of the Polling interval setting, you can change the interval after which MyQ fetches new emails from the mail server.
Click Test to test the connection to the mail server, and then click Save to save your changes.

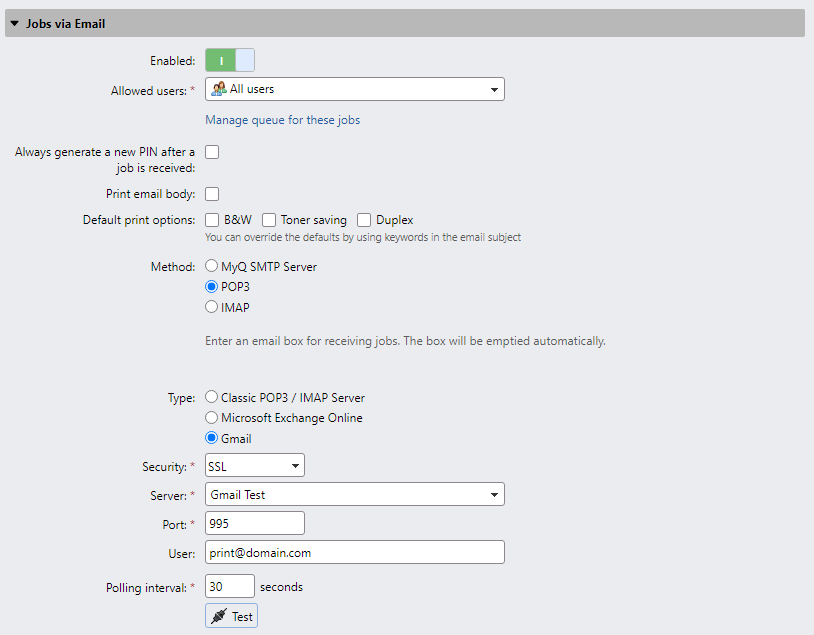
For Gmail:
If you have already set up a Gmail with OAuth2 server in the External Systems settings, that server is selected in the Server field. If not, you can click on the Server field and then click Add to add your Gmail server. In the pop-up, add a Title for your server, the Client ID and the Security key, and click OK. For more information, check Gmail with OAuth2 setup.
Set the Port setting to the correct value that the email server listens to.
Choose between the SSL and STARTTLS Security options.
Enter the address of the email account that will receive the print jobs in the User text box.
By changing the value of the Polling interval setting, you can change the interval after which MyQ fetches new emails from the mail server.
Click Test to test the connection to the mail server, and then click Save to save your changes.

.png)