Recharging Credit via PayPal
If you have a PayPal Business account, you can let users recharge credit with their PayPal accounts from the MyQ Web Interface.
Users should always send payments in the currency that is set on the MyQ server. Payments in other currencies require approval by the PayPal account admin, and credit must be added in MyQ manually.
Setting up PayPal Payments
To integrate PayPal with MyQ, you first create a new App in your organization’s PayPal Business account. Then you set up PayPal as a payment option in the MyQ server settings.
Create a new App in the PayPal Developer Environment
Log in to the PayPal developer portal (https://developer.paypal.com/ ) with your PayPal Business account.
On the Dashboard, under MyApps & Credentials, create a new REST API app.
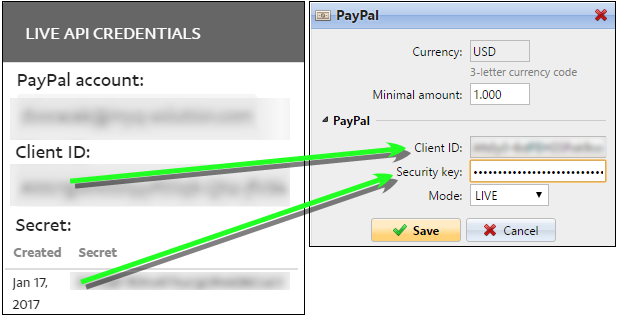
In the App properties, select Live and remember (copy) the app Client ID and Secret. MyQ uses this information to register your PayPal account.
Set up PayPal Payments in MyQ
Go to MyQ, Settings, Credit.
Under Payment providers, double-click the PayPal payment provider. The PayPal properties panel opens.
Type the minimum amount that users must pay when they buy credit.
Enter the Client ID and Secret (Security key) of your PayPal App.

(Optional, recommended) To verify your integration with a PayPal sandbox account, set the Mode to SANDBOX.
To go live with PayPal integration, set Mode to LIVE, and click Save.
Recharge User Credit with PayPal
To update their credit with PayPal, the user completes these steps in the MyQ Web Interface.
Log in to the MyQ Web Interface.
Go to Credit and click Recharge Credit.
Select PayPal as the payment provider and type how much credit to recharge.
Click Recharge Credit.
PayPal opens in a new window where the user completes the payment. PayPal then redirects the user back to MyQ, where a Payment successful dialog box appears.
If you encounter errors with payment provider integration:
Check DNS settings - Ensure your hostname resolves correctly from external DNS servers.
Verify redirection is not blocked - Ensure that redirects between the payment provider and your server are not being blocked by firewalls, security settings, or network configurations.
.png)