Printer Discovery Actions
The actions mentioned below are basic actions that are commonly performed during printer discoveries.
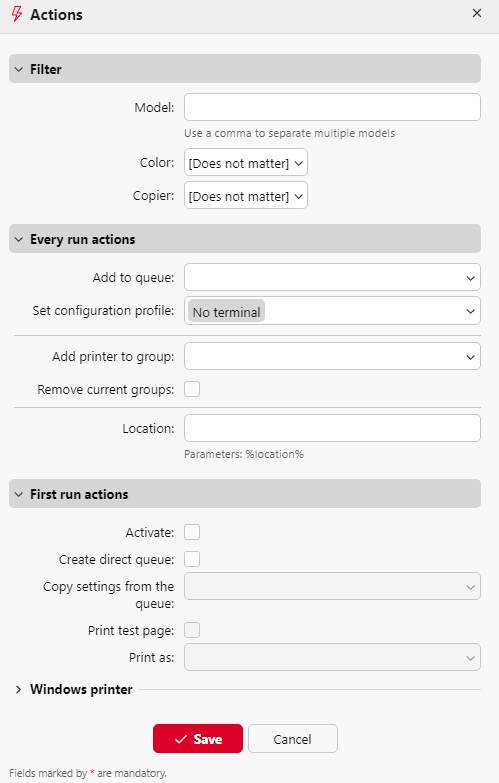
Go to the Actions tab and click +Add action. The Actions properties panel opens.

Filter
Here you can specify the printing device models or the types of devices on which this action is performed during the discovery.
Enter the model on which you want to perform the action. If you want to add more models, you have to separate them by commas (,).
You can also select types of devices: color or B&W devices, and distinguish between copiers.
Every run actions
Add to queue: Here you can select one or more queues where the device will be automatically added to.
Set configuration profile: Here you can select a configuration profile from the dropdown or create a new one by selecting +Add new. It gives you the option to install a terminal package and set the login method for the printers in the discovery.
Add printer to group: Here you can select a group where the device will be automatically added.
Remove current groups: If you select this option, the device is removed from all of its current groups.
Location: Here you can set the location of the printing device. There are three options:
You can manually define the location by entering any text. Each printing device discovered or updated within this printer discovery will contain this location.
You can automatically obtain the location via SNMP protocol by entering the %location% parameter. In such cases, the location is taken from the location parameter defined on the Web User Interface of each particular device discovered or updated within this printer discovery.
You can leave this setting empty. In this case, the location of the printing device is not set/updated
during the discovery. Updated printers maintain their current location and new printing devices have the location parameter undefined.
The location of a printing device is displayed and can be changed on its properties panel.
You can add multiple filters for performing discovery actions: every filter specifies the type of printers the actions will be performed on and which actions will be included.
First run actions
Activate: Automatically activates the device if the current license allows it.
Create direct queue: If you select this option, MyQ will automatically create a direct queue for the device. The name of the queue is the same as the system name of the device. For more information about print queues, see Queues.
Copy settings from the queue: Here you can enter or select a direct queue from which the settings of the newly created queue are copied.
Print test page: The MyQ server will automatically send a test page to the newly created direct queue.
Print as: If you select the Print test page option, you have to select a user account under which the test page will be printed.
Windows printer: In this section you can automatically install a print port and printer driver on the MyQ server.
.png)