Here you can find the installation steps for the Xerox (EIP 3.7, 4.0) embedded terminal.
You can also find information about steps required before the installation, additional configuration needed based on the EIP version, and troubleshooting steps.
It is strongly recommended to reset the printing device to its default factory state before proceeding with the installation, to ensure that no conflicting settings are in effect. After the reset, make sure that the correct time and date are set in the device.
Requirements
-
.NET 4.7.2 or newer needs to be installed on the MyQ Print server.
-
Credit has to be enabled on the MyQ Print server before the installation of the embedded terminal (Xerox EIP 4.0).
-
The latest firmware needs to be installed on the printing device.
-
The IP or Hostname of the printing device has to be valid.
-
The correct time and date must be set on the printing device to avoid issues with the Scan to Me functionality.
-
Only devices with EIP 3.7 and 4.0 are supported. Devices with EIP 3.5 and lower platforms are not officially supported in MyQ Xerox Embedded Terminal 7.6.
-
MyQ Xerox Embedded terminal 7.6 is supported on MyQ Print server 8.2 and newer.
For information about communication protocols and ports, check the MyQ Print Server guide.
Enabling secure connection
Xerox 7.5.0+ only works with an enabled secure connection. For Xerox 7.6.0+, the certificate installation using the PowerShell script is not required.
MyQ 8.1 and lower
-
Download the Xerox terminal installation package from the MyQ Community portal.
-
Open the MyQ web administrator interface, and go to MyQ, Settings, Network.
-
Under Communication Security, set Enable only secure connection to enabled.

-
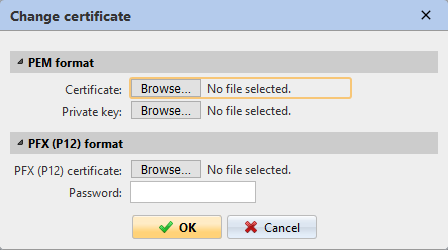
Upload the certificate by clicking Change certificate (proceed to step 5 if you want to use your own certificate. Skip to step 7 to use the default MyQ certificate). The Change certificate window opens.
-
Browse for the certificate and select it when found.
-
Enter the Password connected to the certificate and click OK.
-
Install the MyQ Xerox embedded package to the server in MyQ, Settings, Printers.
MyQ 8.2 and newer
-
Download the Xerox terminal installation package from the MyQ Community portal.
-
Open the MyQ web administrator interface, and go to MyQ, Settings, Network.
-
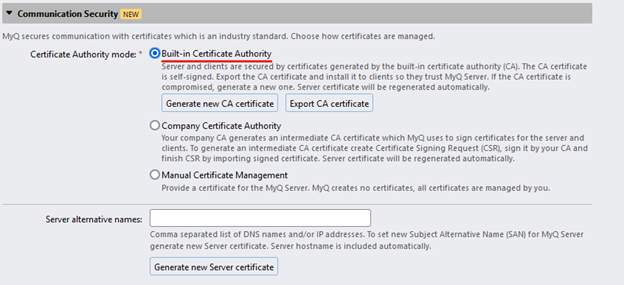
It is possible to use Built-in Certificate Authority in the Communication Security section. In this case no change is required; these are the default settings after the server’s installation.
-
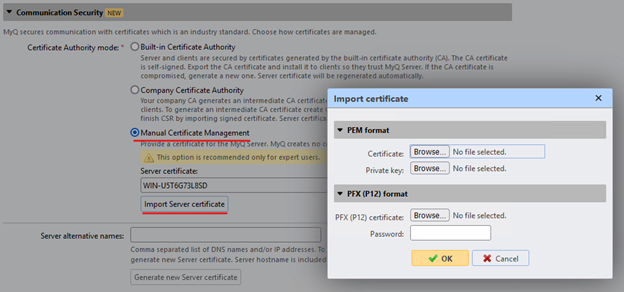
Or it is possible to use custom certificates. In the Communication Security section, set Manual Certificate Management and import your certificates.
-
-
Install the MyQ Xerox embedded package to the server in MyQ, Settings, Printers & Terminals.
For correct installation, it is required to configure SNMP on the MyQ server and in the device web UI. The same values have to be used on the server and on the device. It is recommended to use SNMP v3 but it is also possible to use other versions of SNMP.
Go to the MyQ web administrator interface, in MyQ, Settings, Network, SNMP to configure SNMP on your MyQ server.
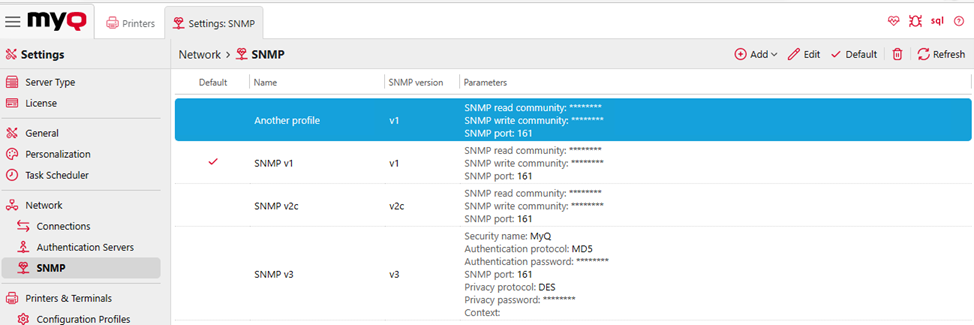
If SNMP v1 or SNMP v2c is used, SNMP read community has to be set to public and SNMP write community has to be set to private.
If SNMP v3 is used, the configuration on the server side has to be the same as the configuration on the device.
To set up SNMP on EIP 3.7 devices, go to the device web UI, Connectivity, SNMP.
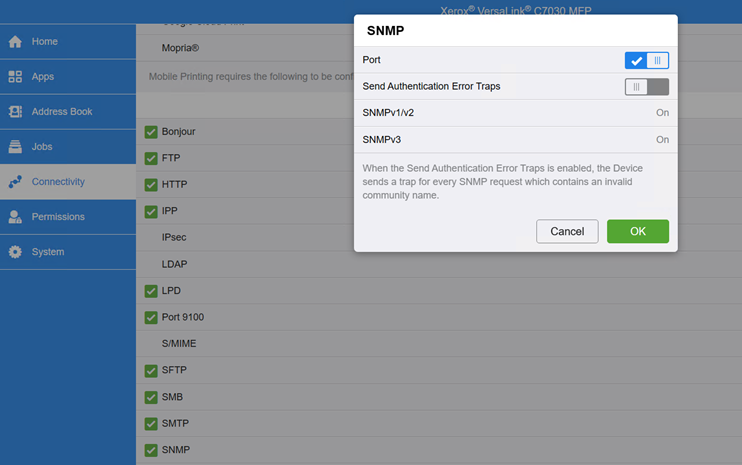
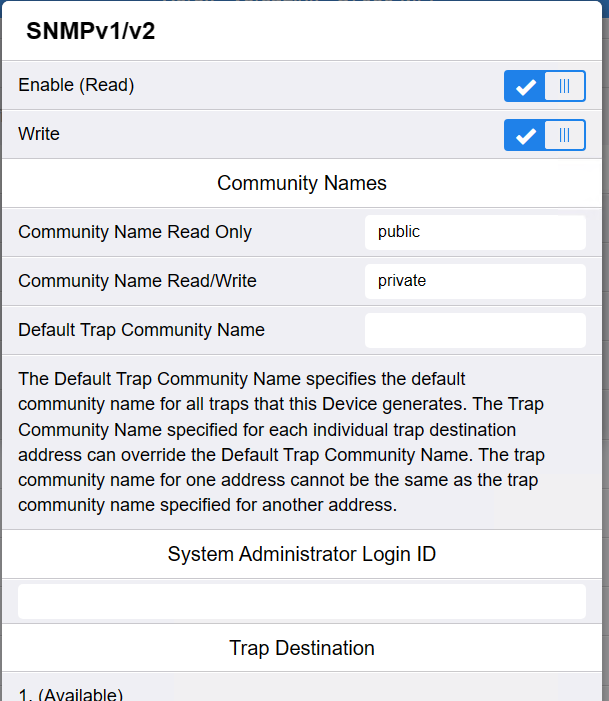
If SNMP v1/v2 is used, Community Name Read Only has to be set to public and Community Name Read/Write has to be set to private.
If SNMP v3 is used, the configuration on the server side has to be the same as the configuration on the device.
To set up SNMP on EIP 4.0 devices, go to the device web UI, Properties, Connectivity, Setup, SNMP.
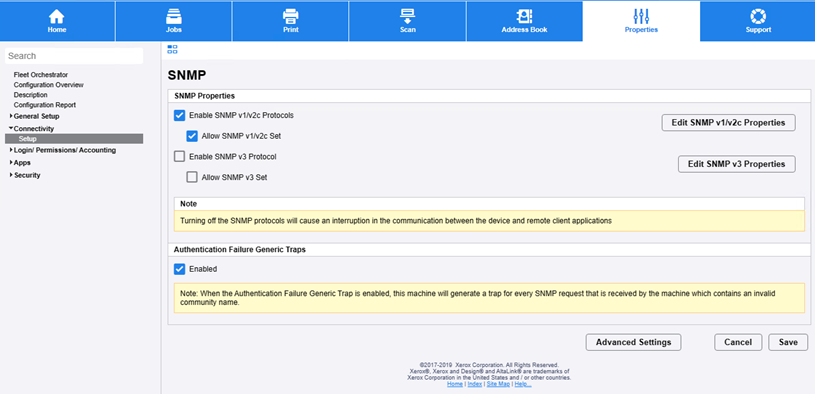
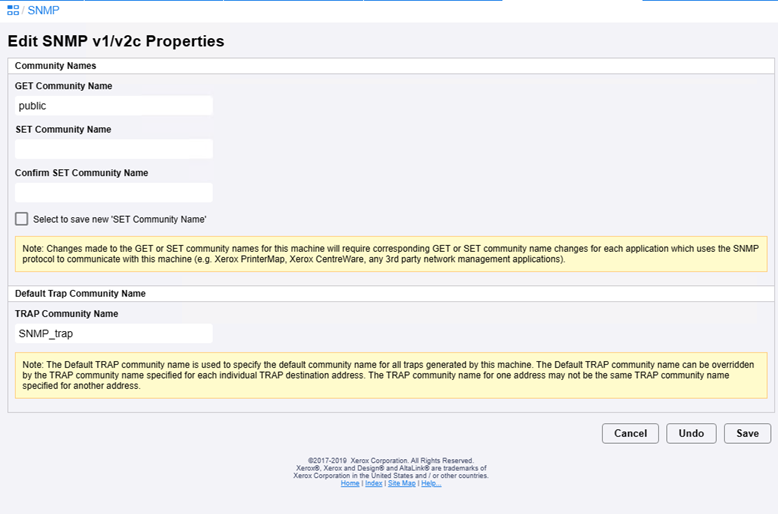
If SNMP v1/v2 is used, GET Community Name has to be set to public and SET Community Name and Confirm SET Community Name has to be set to private.
If SNMP v3 is used, the configuration on the server side has to be the same as the configuration on the device.
Remote installation via Printer Discovery
The easiest way to install the MyQ Xerox Embedded terminal is via remote installation from the MyQ Web administrator interface. This method is very simple and it is preferable, especially when you need to install the terminal on a large number of printing devices, since you can install multiple devices in a batch.
You do this by creating separate printer discoveries and adding a configuration profile to any one of them. At the same time, you can assign the discovered printers to a group and/or queue. Another possibility is to create a remote installation for just one printer and place it in a direct queue.
Before the installation, make sure that the server hostname/IP address in MyQ, Settings, Network is correct. If it’s not, which could happen after a license update or upgrade, the remote setup will fail.

For Xerox EIP 3.0 or lower, follow these steps before the installation.
To remotely install the MyQ Xerox embedded terminal:
-
Follow the instructions in the MyQ Print Server guide to create and configure a Printer Discovery.
-
Then, you should create a configuration profile to attach to your Printer Discovery.
Remote installation via manual setup
The terminal is automatically assigned within the remote installation on the MyQ Web Administrator interface, but if you perform a manual installation instead, you have to assign the terminal to the printing device on the device's properties panel on the Printers main tab. This needs to be done for each printing device separately.
-
Go to MyQ, Printers. The printers overview tab opens.
-
Right-click on a printer and select Set configuration profile. The set configuration profile window opens.
-
Select a configuration profile from the drop-down.
-
Click OK. The profile is added to the properties. You can check it when you right-click the printer and select Properties.
-
Right-click the printer and select Activate.