The terminal is automatically assigned within the remote installation on the MyQ web administrator interface, but if you perform the manual installation instead, you have to assign the terminal to the printing device on the device's properties panel on the Printers main tab, and select the login methods. You can also manually set automatic logout from user sessions.
Assign the Terminal
-
Log on the MyQ web administrator interface.
-
Open the Printers main tab (MyQ, Printers).
-
On the tab, double-click the printing device that you want to set. Its properties panel opens on the right side of the screen.
-
On the panel, under Terminal type, select the Embedded Lite terminal type option.
-
Select login methods, and then click Save. In case the Apply new settings dialog box appears, deselect the Remote Printer Setup option, and then click OK, to submit the changes without remote setup.
Login Methods
-
Simple - You need to select one or both of the simple login options:
-
ID Card - With the ID Card option selected, users can log in by swiping their ID Card. The ID Card has to be registered on the user account on the terminal. For more information about card readers configuration, see USB Card Reader connection.
-
PIN - With the PIN option selected, users can log in by entering their MyQ PIN. If you select this option, you need to make sure that it is set on the printing devices Web UI as well.
-
-
ID Card and password - With the ID Card and password option selected, the user has to swipe their ID card, and then enter their password.
-
ID Card and PIN - With the ID Card and PIN option selected, the user has to swipe their ID card, and
then enter their PIN.
To set login methods on the device's Web UI
While all the login options are automatically set within the remote setup of the terminal, if you want to set them on terminals without the remote installation option, you need to manually change the settings on the printing device's Web UI.
Login by PIN
-
Go to the printing device Web UI (http://*IP Address of the device*). At the upper-left corner, enter administrator credentials, and then click Login.
-
Open the Authentication tab, under Management Settings.
-
Under PIN Login Settings, set PIN Login to On, and then click Submit at the bottom of the tab.

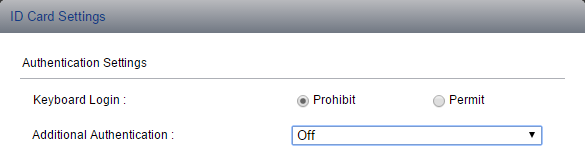
Login by ID Card
-
Open the ID Card tab, under Management Settings.
-
Under ID Card Settings, set Keyboard Login to Prohibit, set Additional Authentication to Off, and then click Submit at the bottom of the tab.
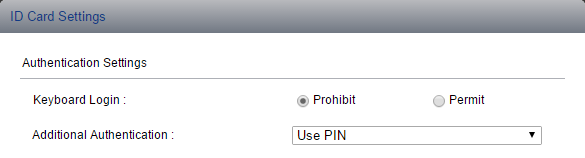
Login by ID Card and PIN
-
Open the ID Card tab, under Management Settings.
-
Under ID Card Settings, set Keyboard Login to Prohibit, set Additional Authentication to Use PIN, and then click Submit at the bottom of the tab.
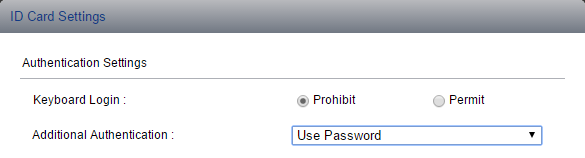
Login by ID Card and Password
-
Open the ID Card tab, under Management Settings.
-
Under ID Card Settings, set Keyboard Login to Prohibit, set Additional Authentication to Use Password, and then click Submit at the bottom of the tab.
The available login methods depend on the device type. Please contact your Kyocera Provider or MyQ Support for further information.