Local Multi-domain Environments (Active Directory)
There are deployment scenarios where users are imported not from a single source, but from multiple sources - usually domains. In this situation, there may be two or more users with identical usernames (but located in a different domain). As each username must be unique, it is necessary to differentiate these users.
Synchronize Users from Multiple Domains
In MyQ’s Settings – User Synchronization, you can create multiple LDAP synchronization sources, one for each relevant domain.
Create Synchronization Source for Active Directory
Follow step-by-step instructions to set up an LDAP user synchronization source:
Avoid Duplicate Users with Similar Usernames
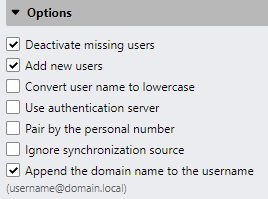
For this purpose, you can ensure the uniqueness of users by checking the option Append the domain name to the username in the user synchronization settings (Settings > User Synchronization > Add > LDAP).
The resulting username will have the format of Username + @ + domain name.
The appended domain name is taken from the Authentication server that was selected for this user synchronization source.
Since a domain controller itself does not allow duplicate users and the domains themselves are also unique, the resulting import will not create duplicate users and finish successfully.

Example:
In your organization, you manage users from multiple domains, where each domain is the organization’s subsidiary. In the domain atlanta.yourcorp.com, there is an employee's account john.doe. However, another john.doe also resides in phoenix.yourcorp.com.
If you just synchronized them from both domains with the default settings, the second john.doe would overwrite the first one.
But if you enable appending the users' domains to their usernames in both LDAP synchronization sources in MyQ, the domain will be attached to their sAMAccountName, and users john.doe@atlanta.yourcorp.com and johndoe@phoenix.yourcorp.com will be created in MyQ.
They can be easily distinguished from each other if their print jobs contain information about the domain.
Detecting the Correct Domain from the Print Job
When a print job is submitted to the MyQ Print Server, the system will assign it to a user. Since we want to also include the domain in this decision, the domain name must be provided in the print job itself. And MyQ needs to know where to read it from.
First, we need to know whether the domain is present in the file that the print driver outputs. To do this, we can catch a job in MyQ and examine the raw print data to see exactly that.
For this test, use the print driver your users will be also using (the same vendor, model, and version).
Send a job to MyQ X from a computer in the domain, using the relevant print driver, as any existing MyQ user.
Go to the C:\ProgramData\MyQ\Jobs folder (or the folder you set to be used for storing print jobs in Easy Config instead of the default Jobs folder) and find the most recent
.prnfile.Open the file and see if the domain is visible in this file.
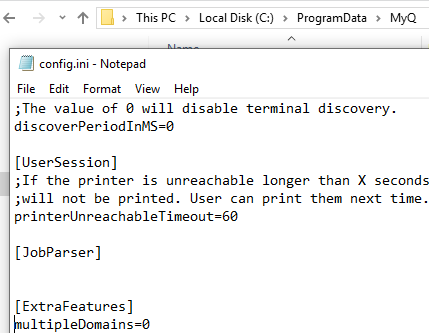
Use multipleDomains with Default PJL Detection Settings
In this scenario, the domain name can be found in the PJL header of the print job produced by the print driver.
This is the case of the Kyocera KX driver, for example. The PJL command should read:
@PJL COMMENT="USERDOMAIN:CustomerDomain.com"
If this is what you see in the incoming job files, you can use the following solution.
From now on, MyQ will use the PJL command to read the user’s domain, and the incoming print job now can be assigned to the correct user with this domain in the username; if there is a user with a similar username containing a different domain, they will not receive access to the document.
Advanced Options
If you’re using a driver that does not populate the print job with the PJL command @PJL COMMENT="USERDOMAIN:CustomerDomain.com", you can use the following steps to obtain the domain name from the PJL header by reading it from a different PJL command.
PJL Detection Settings on the Queue
This is applicable for versions of MyQ X 10.2+.
From now on, MyQ will use the PJL command to read the user’s domain, and the incoming print job can now be assigned to the correct user with this domain in the username; if there is a user with a similar username containing a different domain, they will not receive access to the document.
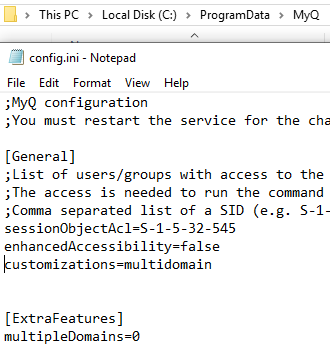
Using Customization Scripts
This is applicable for versions of MyQ X 10.1 and below.
User Detection Script for Download
The script is verified for Kyocera, HP, and Canon drivers, otherwise might require RegEx and PJL fields modification.
Download:
From now on, the print job will detect the user based on the queue settings and the domain from the PJL attribute which is detected and modified by the PHP file using RegEx.
.png)


