Unlock Panel
Unlocks the printing device's panel and opens the native device screen.
Panel Copy
Opens the printing device's copy screen.
Panel USB
Opens the printing device's USB screen.
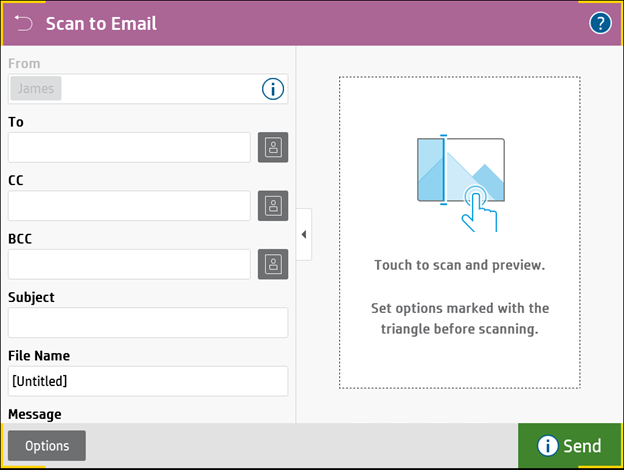
Panel Scan
This terminal action opens the printing device's scan screen.
MyQ is able to automatically send scanned documents to a specified folder or email belonging to the scanning user, with the Scan to Me feature. To set up Scan to Me, go to the Scanning & OCR settings tab, under General and Enable scanning.
You can also change the subject and message of the email with the scanned document there. As the sender of the document, you can select either the email of the logged user or the default sender email set on the Network settings tab, under Outgoing SMTP server.
The scanning function requires enabling the SMTP protocol, setting the SMTP server address and entering a sender email on the printing device web interface. For information about how to enter the printing device web interface and find the particular settings, see the printing device manual.
Set SMTP on the printing device
To enable the scanning function, take the following steps on the printing device web interface:
-
Enable SMTP protocol.
-
Enter the MyQ server IP address or hostname.
-
Ensure that the SMTP port is the same as the SMTP port in the Network settings tab, under MyQ SMTP server. The default port in MyQ is 25.
-
Enter sender email address. The address value is arbitrary.
Set the destinations for the MyQ users on the MyQ server
On the properties panel of each individual MyQ user, you can set the destinations using three options: Sending scans to the user's primary email, Sending scans to other predefined emails, Storing scans to the user's scan folder.
To provide a user with these options, set the appropriate fields on their properties panel.
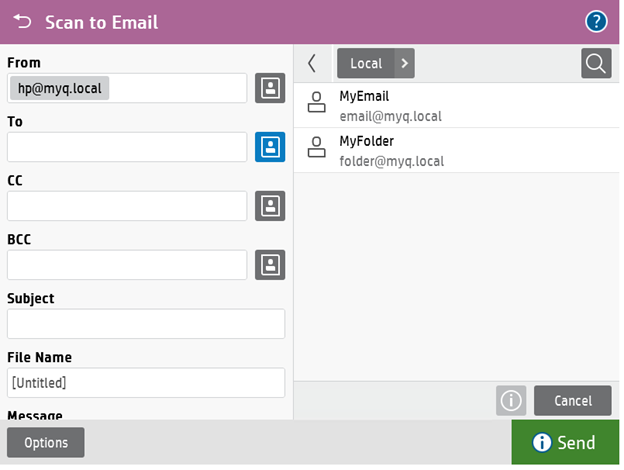
To send the email to the desired destination, the scan needs to be directed to a specific receiver email address. There are two options to enable the MyQ users to send the scans there: provide them with the respective receiver email address, or predefine these email addresses on the printing device's Web User Interface.
Email addresses for Scan to Me
-
Sending scans to the user's primary email - The scanned document is sent to the user email set in the email text box on the user properties panel.
The receiver email address has to be email@myq.local. -
Sending scans to other emails - The scanned document is sent to all emails set in the User's storage text box (multiple emails should be separated by commas) on the user properties panel.
The receiver email address has to be folder@myq.local. -
Storing scans to the user's scan folder - You have to create a shared folder and ensure that MyQ has access to this folder. After this, enter the folder's location to the User's storage text box. The scanned document is sent to MyQ, and then stored in the shared folder via the SMB protocol. The stored document file name consists of the user account name, and the date and the time when the scan was sent.
The receiver email address has to be folder@myq.local.
To enable MyQ to save the scan file in the user scan folder, you have to make sure that the folder is shared over your network and that the computer where you run MyQ has all the necessary access rights to this folder.
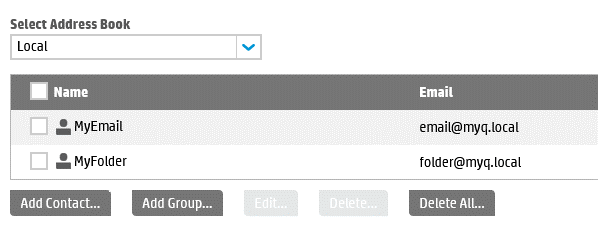
Predefined list of the MyQ destinations on the printing device
During the installation of the MyQ HP Embedded terminal, the Scan to Me destinations are saved in the device, but the shortcuts aren’t created automatically. It is possible to create them manually in the device web UI, in Device web UI, Scan/Digital Send, Contacts:
Using the user’s email address as Sender address.
Another feature is using the user’s email address as Sender address. For this to work, some settings are required in the device web UI:
-
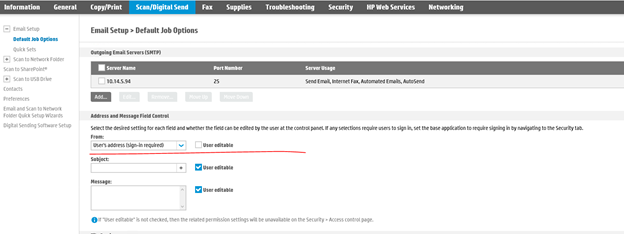
Open the HP web UI and go to Scan/Digital Send > Email Setup > Default Job Options.
-
In the Address and Message Field Control section, set the From field to User's address (sign-in required).
-
Uncheck the User editable option next to it/
-
Click Apply.
With this feature set up, when a user uses Panel Scan to Email, the From field is populated with the MyQ user's full name, and it is greyed out and not possible to edit.