
Admin Setup
This chapter, intended for MyQ administrators, provides the reader with information about the initialization, login, and configuration of the MyQ Recharge Terminal.
Initial Setup
In the MyQ web administrator interface, go to MyQ, Settings, Credit.
In the General section, make sure Credit is enabled. If not, enable it and click Save.
In the Payment providers section, select External Payment Providers and click Enabled (or right click and select Enabled).
Download the MyQ Recharge Terminal installer from the MyQ Community portal, and install it on your server.
Starting the MyQ Recharge Terminal
Before starting the MyQ Recharge Terminal, make sure that the power cord and the network cables are connected.
Unlock and open the door of the MyQ Recharge Terminal.
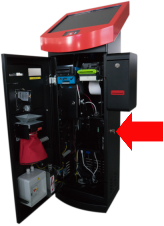
Turn the NanoPC on using the "Power" button.
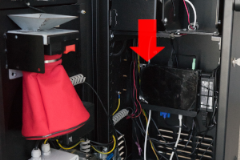
Close and lock the door, and then wait for the system to initialize.
Admin Login
In order to configure the MyQ Recharge Terminal, you have to use the Administrator Mode.

To enter the Administrator mode, tap the MyQ logo at the top of the screen. Enter the administrator's PIN (1087 by default — it can be changed on the Management tab), and then tap Log in. Alternatively, you can first enter the administrator's PIN on the login screen, and then tap the MyQ logo. The administration screen opens.