.png)
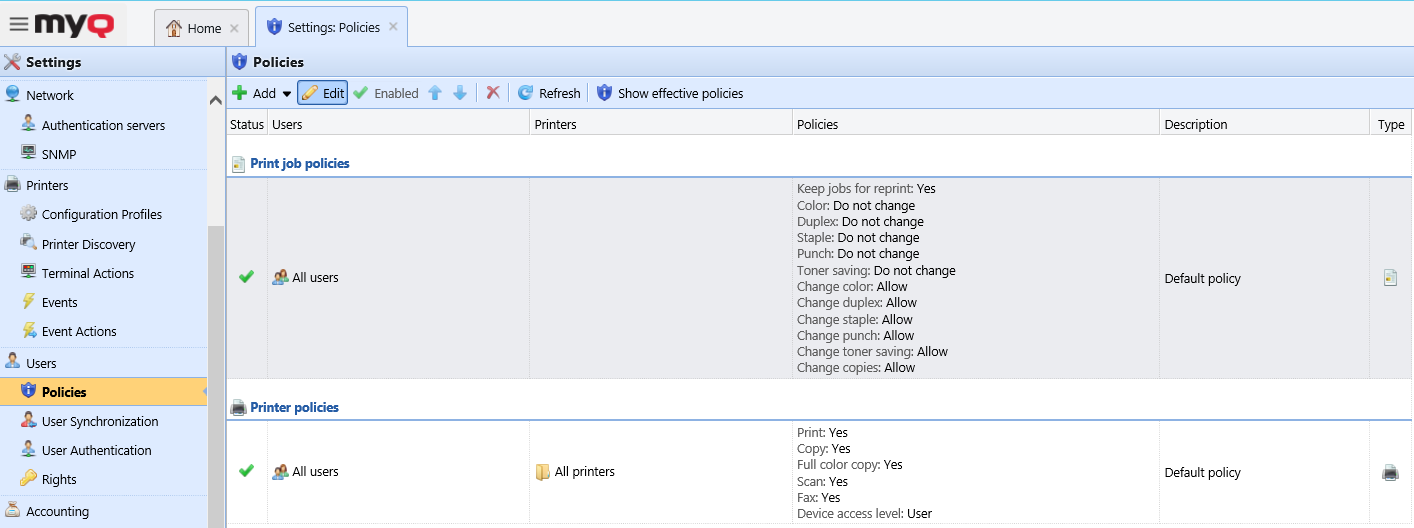
Policies
The Policies settings tab is divided into two sections. The Print job policies section contains settings that apply to all print jobs, all printers and selected users or groups.
The Printer policies section contains settings that apply to all queues, all print jobs, selected users (or groups) and selected printers.
Print job policies have the highest priority. Settings in the Printer policies section apply to all queues and all of the selected users, regardless of the settings of queues and print job policies.
An in-depth look at MyQ user policies and how to implement them to attain your organizations goals can be found here.
Policies in both sections are listed in order of precedence: every policy has a higher priority than all the policies below it. If two policies are in conflict, the policy that is higher on the list applies. The default policy has the lowest priority and is always at the bottom of the list, other policies can be moved up and down the list by clicking the left or right arrow buttons on the Policies settings tab toolbar.
Print Job Policies
To open a print job policy properties panel, double- click the print job policy on the Policies settings tab list, under Print job policies.
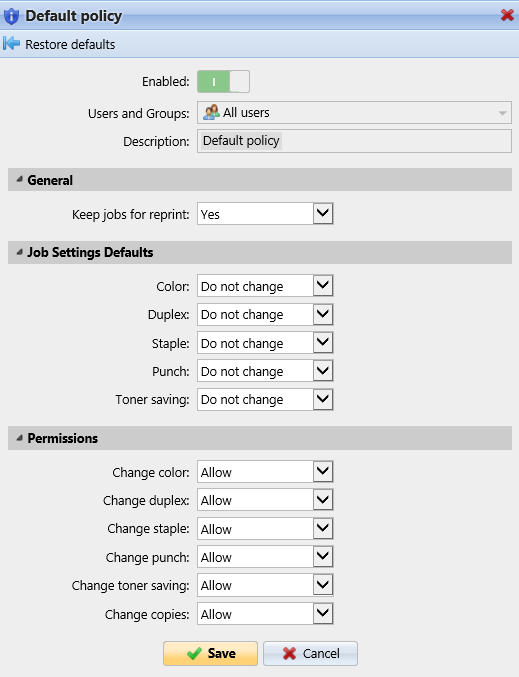
Each print job policy panel is divided into four sections:
In the upper section, you can enable or disable the policy, select the Users and Groups of users that it will apply to, and add the policy Description.
In the General section, mark the checkbox to be able to modify the setting and choose Yes/No if you want to Keep jobs for reprint.
In the Job Settings Defaults section mark the checkboxes to be able to modify the below settings:
Color: Do not change, Color, B&W
Duplex: Do not change, Simplex, Duplex long edge, Duplex short edge
Staple: Do not change, No Staple, Upper left corner, Booklet, Lower left corner
Punch: Do not change, No Punch, 2 holes, 3/4 holes
Toner saving: Do not change, No, Yes
In the Permissions section mark the checkboxes to be able to modify the settings and you can choose whether to Allow or Deny them:
Change color
Change duplex
Change staple
Change punch
Change toner saving
Change copies
Click Save and your new Print job policy appears in the Policies list.
Default print job policy
The Default policy applies to all users and has no restrictions. Except for its name and scope, all the settings of this policy can be changed.
You can restore the default settings by clicking Restore defaults on the top-left corner of its panel.
Adding new print job policies
On the bar at the top of the Policies settings tab, click +Add, and then click +Add print job policy. The new print job policy properties panel opens on the right side of screen.
On the panel, select the users or group of users that the policy will apply to, optionally write a description of the policy, change its settings, and then click Save.
The new policy appears on the Policies setting tab, under Print job policies.
With all the Permissions set to Deny, users are not able modify their jobs on the MyQ Embedded terminals.
With the Keep jobs for reprint setting set to No, users are not able to add their jobs to Favorites on their account on the MyQ Web Interface or on MyQ Embedded terminals and they cannot reprint old jobs on the embedded terminals either.
The Keep jobs for reprint setting is also available when configuring a queue. The following combinations between the Keeps jobs for reprint Policy and Queue setting are available:
Policy ON + Queue ON - The print job file is saved and can be reprinted even when not marked as favorite.
Policy ON + Queue OFF - The print job file is saved only when marked as a favorite before printing. Favorite jobs can be reprinted.
Policy OFF + Queue ON - The print job files are always saved, but because of the policy they cannot be reprinted or marked as favorite by the users. If the Policy is changed to ON, then the jobs can be reprinted later.
Policy OFF + Queue OFF - The print job files are always deleted right after printing, cannot be reprinted or marked as favorite. If the Queue or Policy is changed to ON, jobs cannot be reprinted anyway.
Printer Policies
To open a printer policy properties panel, double-click the printer policy on the Policies settings tab, under Printer policies.
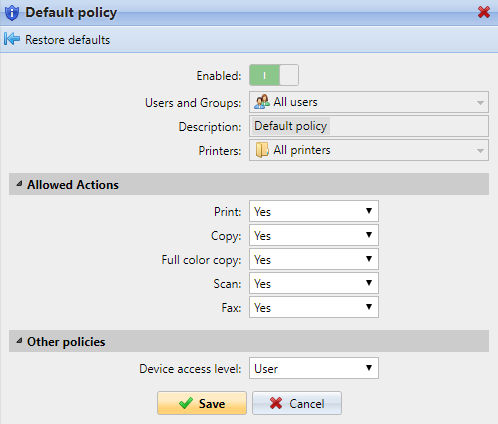
Each printer policy panel is divided into three sections:
In the uppermost section, you can enable or disable the policy, select the Users and Groups of users that it will apply to, select the printers that it will apply to and write the policy description.
In the Allowed actions section, you can restrict access to particular operations on the selected printing devices. The available operations are:
Print
Copy
Full color copy
Scan
Fax
In the Other policies section, you can provide users with administrator access to printing devices via the embedded terminal menu. For some devices, this option is not supported.
Default printer policy
The Default policy applies to all users, all printers, has no restrictions and gives users User access to embedded terminals. Except for its name and scope (It applies to all users and all printers), all settings of this policy can be changed.
You can restore the Default policy default settings by clicking Restore defaults on the top-left corner of its panel.
Adding new printer policies
On the bar at the top of the Policies setting tab, click Add, and then click +Add printer policy. The new policy properties panel opens on the right side of screen.
On the panel, select the users or group of users that the policy will apply to, optionally write a description of the policy, change its settings, and then click Save. The new policy appears on the Policies settings tab, under Printer policies.
Checking policies applied to individual users
The levels of policy applied to individual users at specific printers can easily become complex, however, you can use the Show Effective Policies action to get a quick overview of policies on a user level.
From the Users tab, select Actions from the top-left of the navigation bar, and click Show Effective Policies.
Select the user for whom you want to view effective policies, and optionally, a specific printer, and click Show Effective Policies.
The policies currently applied to this user (on the relevant printer if selected) are listed in the categories Allowed Actions, General, Job Settings Defaults, Other Policies, and Permissions.
