Skip table of contents

Scan to OneDrive for Business

The feature in MyQ, Settings, Connections. Click Add and select OneDrive Business.

In the pop-up window, add a Title for your connection, and then you can either select the Create automatically Mode or the Set up manually Mode.

Create automatically

This mode allows the administrator to have MyQ create the enterprise application (service principal) on their tenant and grant this application permissions to access user data.

OneDrive Business auto mode

Prerequisites

  • For Steps 1 and 2 (creating the service principal on the customer’s tenant), Application Administrator or Cloud Application Administrator roles are required.

  • For Step 3 (granting admin consent to the service principal), the Global Administrator role is required

  • To finish all steps in the automatic setup, the Global Administrator role is required (however, settings can be saved after Step 2 is complete, and finished later using an account with sufficient permissions)

Steps to automatically set up the OneDrive Business application

  1. The administrator signs in with their Azure Administrator account.

    • MyQ X for OneDrive Business service principal is created on the tenant.

    • The administrator grants the application permission to manage Azure applications (permissions requested in this step: offline_access, Application.ReadWrite.All - to create a secret key for this application).

    • The authorization code is returned to helper.myq.cz, the administrator copies the authorization code.

  2. The authorization code, returned in the previous step, is provided to MyQ.

  3. The administrator signs in with their Azure Administrator account and grants the MyQ X for OneDrive Business enterprise application permissions to read/write to OneDrive and grants admin consent (individual users do not have to consent subsequently)

    • Permissions requested in this step: Sites.Read.All, Sites.ReadWrite.All, Files.Read.All, Files.ReadWrite.All - to access OneDrive data.

  4. Once the OneDrive Business connector is saved, a Secret key is created for this service principal in Azure, and securely saved in MyQ.

  • The validity of the Secret is 2 years. Be sure to rotate the key when its expiration is due. You can do this with the Re-authorize option in MyQ.

  • Credentials for service principals are not visible in the Azure portal. They can be managed via PowerShell or Microsoft Graph API.

  • In case you need to revoke the app’s access or currently used Secret, you can simply delete the entire MyQ X for OneDrive Business enterprise application in Azure, and create a new one with the Re-authorize option in MyQ.

Permissions granted to the application:

Permissions granted to the application

  • If the automatic setup is completed again, it does not create a new instance of the application on the tenant, but the current application is updated (e.g. new secret on the service principal on the tenant created). If the MyQ X for OneDrive Business application has been removed from Azure, it is created again.

  • Service principal (enterprise application) is created on the tenant after Step 1 (without necessary permissions which are granted in Step 3). If the authorization code is provided in Step 2, the connector can be saved. Step 3 can be finished later (by right-clicking the OneDrive Business connector and selecting Re-authorize).

  • To better understand what MyQ is doing in this mode, Microsoft explains this method in their Developer documentation – Understand user and admin consent from the perspective of the application developer

Set up manually

It is expected that the administrator has configured the Azure application manually. They can directly provide credentials to their application - Tenant ID (directory ID), Application ID (client ID), Security key (secret key).

Steps to manually set up the OneDrive Business application

To set up the access, you have to create a new Azure AD app registration to be used by MyQ, and enter the Azure AD Application ID and Secret on the Connections settings tab in the MyQ Web administrator interface.

In Azure AD, you need to create and set a new Azure Active Directory App registration to be used by MyQ. After the registration is created, you set permissions and create a secret key. You need the Tenant ID, the Application ID and the secret key to create a Connection for OneDrive for Business on the MyQ Web Interface. The secret key populates the Security key field.

  1. Go to https://portal.azure.com/ and log in with your global admin user account.

  2. In the Azure dashboard, in the left navigation pane, click Azure Active Directory and on the left menu, click App registrations.

  3. To create a new application, click New registration. The Register an application page appears.

  4. In the Name box, type a name for the application.

  5. Choose Supported account types.

  6. In the Redirect URI box, choose Web and https://helper.myq.cz/ .

    Registering a new app in Azure
  7. Click Register.

  8. Set the permissions:

    Setting permissions
    1. On the preview screen, click View API permissions.

    2. Click Add a permission. The Request API permissions pane appears.

    3. User.Read permissions are added by default. Add Delegated or Application (admin consent granted is needed) permissions to Files.ReadWrite for the Microsoft Graph.

  9. Back on the preview screen, click Overview, and then copy and save the Application ID, because you need it in the next steps.

    Copying the Application (client) ID
  10. On the preview screen, click Certificates and secrets, and complete the following steps:

    Adding a client secret
    1. Click New client secret.

    2. Add a Description.

    3. Set the expiry for the key to Never.

    4. Click Add.

    5. Save the client secret key value, because you need it in the following steps and you cannot retrieve it later.

  11. In the Connections settings tab on the MyQ Web Interface (MyQ, Settings, Connections), in the add OneDrive Business window, where you selected the Set up manually mode, provide credentials to their application - Tenant ID (directory ID), Application ID (client ID), Security key (secret key).

Option “Application has access to OneDrive Business of all users”

The Application has access to OneDrive Business of all users checkbox lets the administrator set whether the application has already been given access to the OneDrive storage of users or not.

  • If unchecked, it is expected the application has been given only Delegated permissions, which means each user has to manually log in to the MyQ Web User Interface and click the “Connect” link to give the application permissions to access their data.

  • If checked, it is expected the application has been assigned Application permissions to access OneDrive data and the administrator has granted admin consent to the application, all manually in Azure Portal. The users do not have to manually connect their storage, OneDrive Business storage appears to be connected in the widget on their MyQ Web User Interface.
    Conditions when this option is enabled:

    • Manually created Azure application must have Files.ReadWrite.All permission of the Application type (not Delegated).

    • Admin consent granted (“Granted” displayed in the Status column), can be granted with the “Grant admin consent” option.

Create and set the OneDrive for Business destination

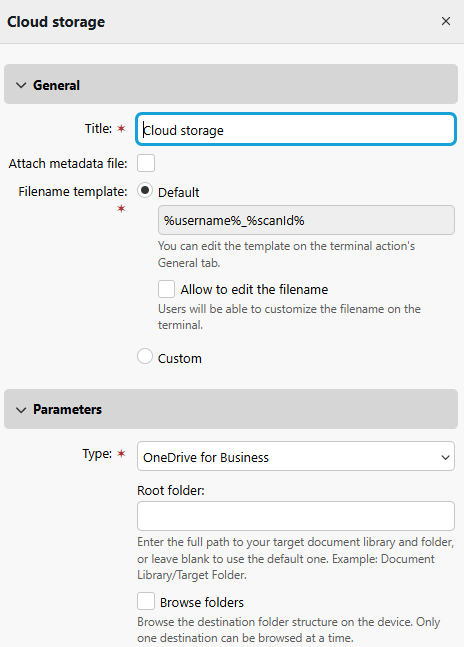
  • Create a new destination (edit or create an Easy Scan terminal action; on its properties panel, in the Destinations tab, click +Add).

  • On the new destination's properties panel, under General, select the Cloud Storage option in the Type drop-down.

  • In the Parameters section, in the Type drop-down, select OneDrive for Business or any other Title you defined in the Connections settings in the previous steps.

  • Select the Browse folders option if you want users to be able to browse one of their cloud destinations folder on the device.

  • Click Save.

Pairing users with their OneDrive

When the Automatic mode was used or “Application has access to OneDrive Business of all users” was checked in the manual setup, there is no user interaction needed for the users to use their OneDrive in MyQ. Users are paired with their OneDrive storage via User’s Active Directory Object ID (UUID). These are automatically imported only with the Azure AD user’s synchronization into MyQ. The UUID is synchronized from Central to Sites during user sync when Central users are synchronized with Azure AD. This process enables users at a Site to be automatically connected to their storage.

Users created manually or synchronized from sources other than Azure AD will see this OneDrive Business as “Connected” on their MyQ Web User Interface, but they are not paired with any OneDrive account, so they cannot use this destination.

Re-authorizing the OneDrive Business connection

The automatic connection to OneDrive Business can be changed after it has been created. By right-clicking on the connection, the Re-authorize option will be available in the context menu.

Reauthorize option

The user will be shown the same dialogue as when the connection was created. The user can repeat all the steps to create a new secret for the existing OneDrive Business connection. Or they can perform step 3 - Administrator’s consent, if it was not completed when the connection was created for any reason, for example, due to insufficient rights of the Azure administrator.

Also, the Re-authorize option allows you to change the type of connection created from automatic to manual, and vice versa.

JavaScript errors detected

Please note, these errors can depend on your browser setup.

If this problem persists, please contact our support.