User Synchronization
You can add your users one by one, or import user data into MyQ from different sources.
By clicking Add users manually, you open the Users main tab, where you can manually add users. This action is described in the MyQ Print Server guide.
By clicking Import users, you open the Users Synchronization settings tab, where you can import users from the MyQ Central server, from LDAP servers or from a CSV file. In this manual we will describe the import via an LDAP server with an Active Directory. For the other methods, see the MyQ Print Server guide.
Creating the synchronization
Click Import Users on the Quick Setup Guide widget on the MyQ web administrator interface dashboard. The User Synchronization settings window opens.
Click +Add sync source on the main ribbon, and select Add LDAP source. The LDAP synchronization window opens.
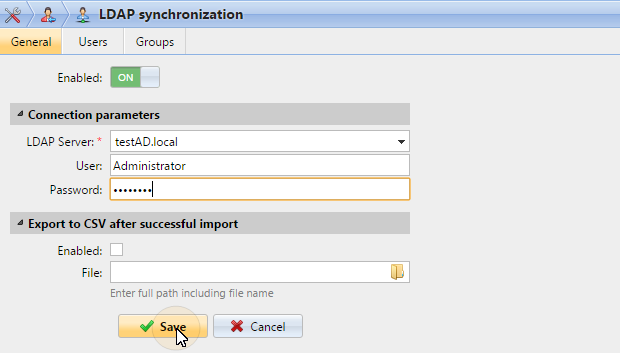
On the General tab, make sure LDAP synchronization is Enabled, and fill in the following:
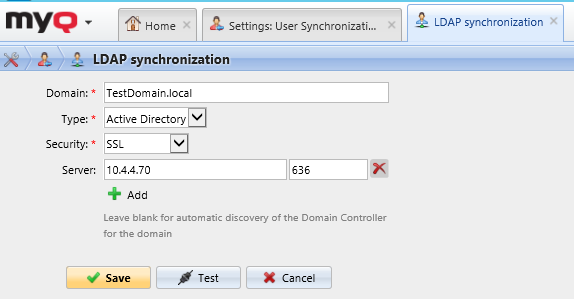
In the LDAP Server field, click on the arrow and select +Add new from the drop-down.
Fill in the required information:
Domain: add the LDAP domain.
Type: Select Active Directory from the drop-down.
Security: Select SSL from the drop-down.
Server: Click +Add to manually add your server's IP address and port, or leave it empty for automatic discovery.
Click Test to make sure the connection is working, and then click Save.
Your new domain should now occupy the LDAP Server field. Add the User and Password needed for authentication on your LDAP server.
You can enable the Export to CSV after successful import option and MyQ creates a CSV file with the imported users after the synchronization. You can then browse to select the folder where you want the CSV File to be saved in.
Click Save.
In the User setting, a sub-domain user account with enough rights can also be used for authentication, but the sub-domain has to be specified in the username.
For example, the user Administrator connects to the testAD.local LDAP server, but their account is in the cz.testAD.local sub-domain. For successful authentication, the filled in username should be:
Administrator@cz.testAD.local
On the Users tab, pick one or more Base DNs (distinguished names) from which you import the users. In addition, you can assign user attributes from the LDAP server to user properties in MyQ and select additional options concerning the synchronization.
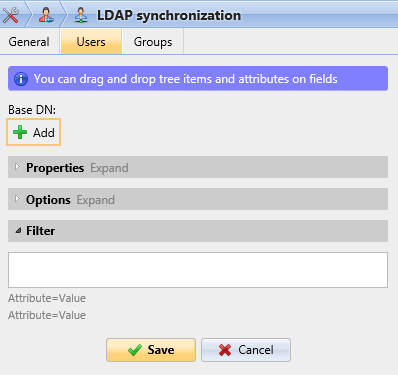
Base DN: Here you can pick the base domain or domains from which you import users. Click +Add to add a text box for the new base DN, and then drag a group from the database browser and drop it in the text box. You can add multiple domains this way.
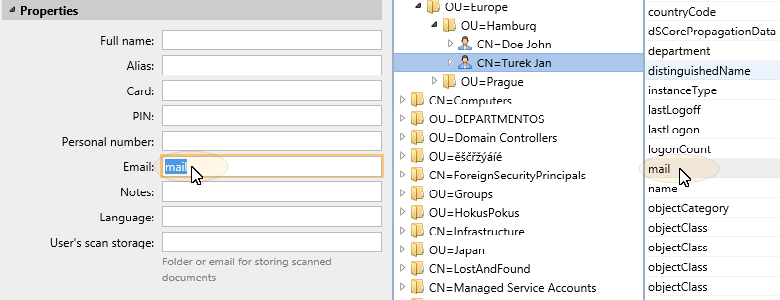
Properties: These are the properties of every individual user. MyQ will automatically find and assign the user's SAM account name to user name, cn to full name and mail to Email (this applies to Active directory and OpenLDAP only). The user name property is the only one that cannot be changed. To assign an attribute to a property, write the name of the attribute in the property text box or drag it from the attributes of any individual user and drop it in the text box. The following properties support adding multiple values to them, separated by a semicolon (;):
Alias
PIN
Card
For example, in the Alias property, you could add alias1;alias2;alias3.
The AD attribute name should not contain the semicolon (;) character. If a semicolon is part of the attribute's name, that attribute will not be synchronized in MyQ.
For assigning default languages to users, you have to use an attribute from the LDAP server that has the language abbreviations as its values. For example, you can create and use an attribute called lang with the values en for English, hr for Croatian, etc. The list of the abbreviations used in MyQ can be found here.
Options: For a description of the common synchronization options, see User information and settings. In addition to the basic options that are common for both the synchronization from LDAP servers and for synchronization from CSV files, there is one specific option that belongs only to the import from LDAP servers: append the domain name to the username (username@domain.local). This option enables you to save the information about the LDAP server in the user name. For more information about this
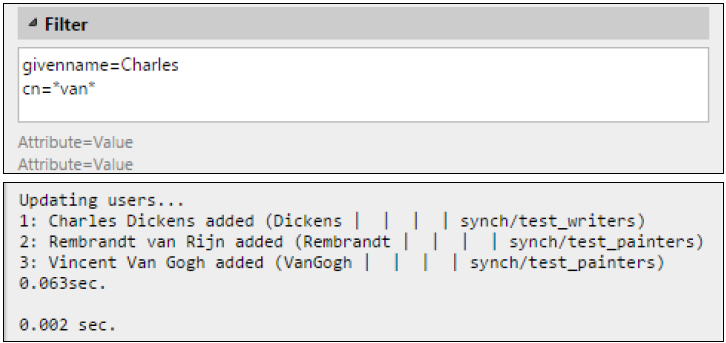
option, contact your MyQ support.Filter: You can filter the users import by specifying the values of attributes. Add the conditions in the form: Attribute=Value. Users with a different value on this attribute are not accepted and are filtered out of the import.
For attributes where the values are strings, such as the cn attribute, you can use the * symbol to search for substrings. The symbol can be appended from both sides. For example, if you add a cn=*in* condition, only users whose common name attribute contains "in" are accepted.
Add one condition per raw. Users are accepted if they satisfy at least one condition.
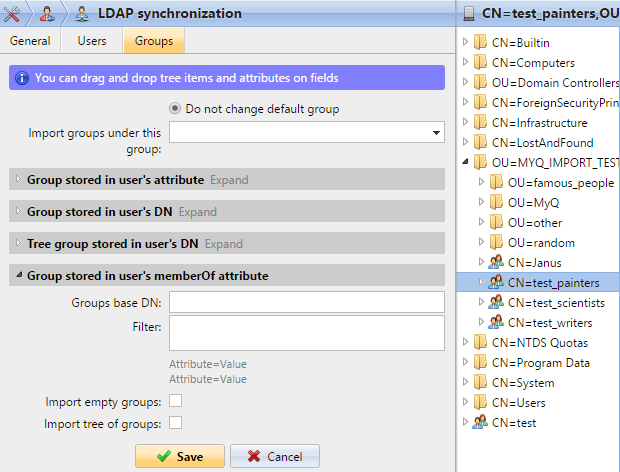
On the Groups tab, you can import groups and the group structure from the LDAP source. There are four different ways of specifying which groups are imported. You can use multiple different methods together and by each method, you can create different groups of users. You can also select to import the groups under an existing group in MyQ.
Do not change default group: A user can be a member of multiple groups but all their prints, copies and scans are accounted to only one group: the default (accounting) group of the user. If you select this option, the default group of the selected user does not change during the synchronization.
Import groups under this group: You can select an existing group in MyQ under which you import the groups from the LDAP database.
Groups stored in user's attribute:
Attribute: You can select this option if you want to use an attribute that defines groups in the LDAP database. To add it, type the name of the attribute in the property text box or drag the attribute from any individual user and drop it in the Attribute text box.
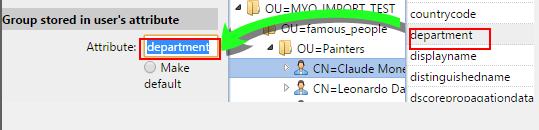
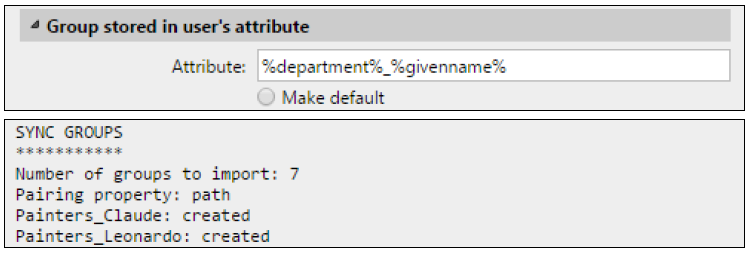
You can also create groups by combining multiple attributes. To create such groups, put each of the attributes between two percentage signs (%). For example, the combination of attributes %attribute1%_%attribute 2% , imports a new group named value1_value2.
Furthermore, you can create tree structures of groups by separating the attributes with vertical bars. For example, the combination of attributes %attribute1%|%attribute2%, imports a group value1, and its sub-group value 2.
Make default: If you select this option, the group becomes the default group of the imported user.
Group stored in user's DN:
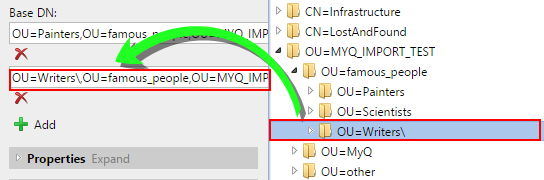
OU component index: Here you can select a group by its OU (organizational unit) index among the DN components. The index is counted from right to left: the first OU group from the right has index 1, the second from the right has index 2 and so on.

On the image above, there are three OU groups: MYQ_IMPORT_TEST has index 1 (as it is the first OU group from the right), famous_people has index 2 and Painters has index 3. The other components are not OU and therefore have no index.
Make default: If you select this option, the group becomes the default group of the imported user.
Tree group stored in user's DN: Here you can import the whole tree structure of groups. You can restrict the import to any part of the structure by striping the DN components from the left and from the right. In the respective text boxes, enter the amount of components to be striped from the left and
from the right side. You have to strip at least one component from the left (the user CN component) and one component from the right (the right-most DC component).
On the image above, there are six components. If you strip one component from the left
and one from the right, you import the following structure of groups: testAD > MYQ_IMPORT_TEST > famous_people > Painters. By stripping components from the left, you remove the groups from the bottom to the top of the structure. By stripping components from the right, you remove the groups from the top to the bottom of the structure.Make default: If you select this option, the bottom group of the imported structure becomes the default group of the imported user.
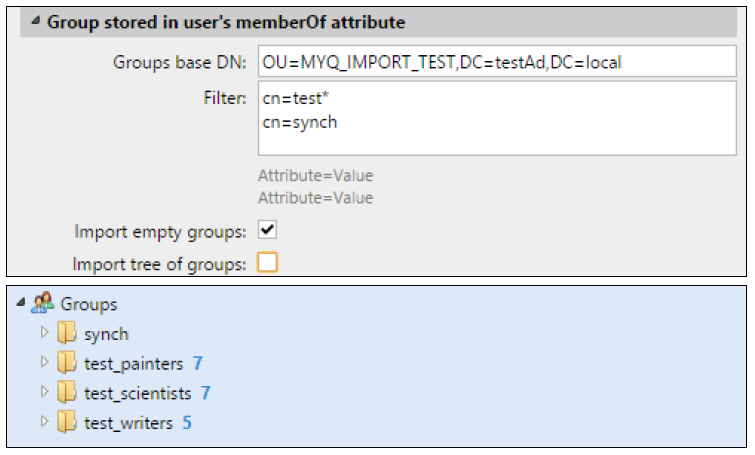
Group stored in user's memberOf attribute:
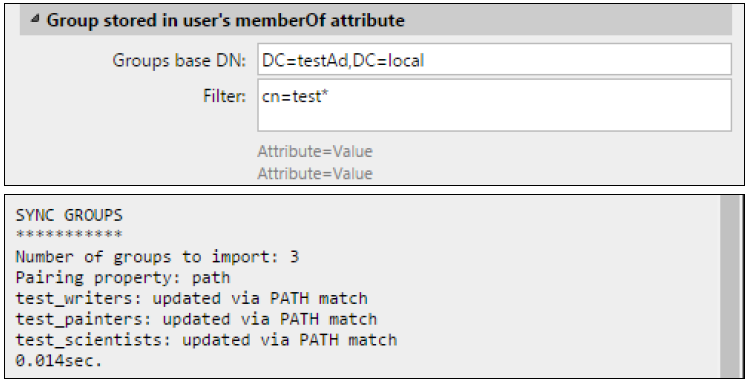
Group base DN: MyQ can import security and distribution groups stored in the user's memberOf attribute. The security groups are used to define access permissions granted to their members. Distribution groups can be used for sending emails to a group of users. To specify which groups should be taken into consideration during the import, you have to insert the groups base DN. MyQ imports only groups that are included in the base DN; other groups stored in the memberOf attribute are ignored. The group base DN does not have to be in the same organizational unit as the users base domain. If a user is member of more than one group on the LDAP server, all the groups are stored in the memberOf attribute. Therefore, the Make default option, which requires a single value, is not available for this method of import.
To add the groups base DN, drag it from the database browser and drop it in the Group base DN text box.Filter: You can filter this import by specifying the values of attributes. Add the conditions in the form: Attribute=Value. Groups with a different value on this attribute are not accepted and are filtered out of the import. You can use the * symbol to search for substrings. The symbol can be appended from both sides. For example, if you add a cn=*in* condition, only users whose common name attribute contains "in" are accepted. You can add one condition per raw. Groups are accepted if they satisfy at least one condition.
Import empty groups: If you select this option, groups from the Group base DN are imported even if there is no user having them in their memberOf attribute.
Import tree of groups: If you select this option, the whole tree structure is imported. Otherwise all groups are added separately; not as a part of a tree structure.