Using MyQ Theme Editor
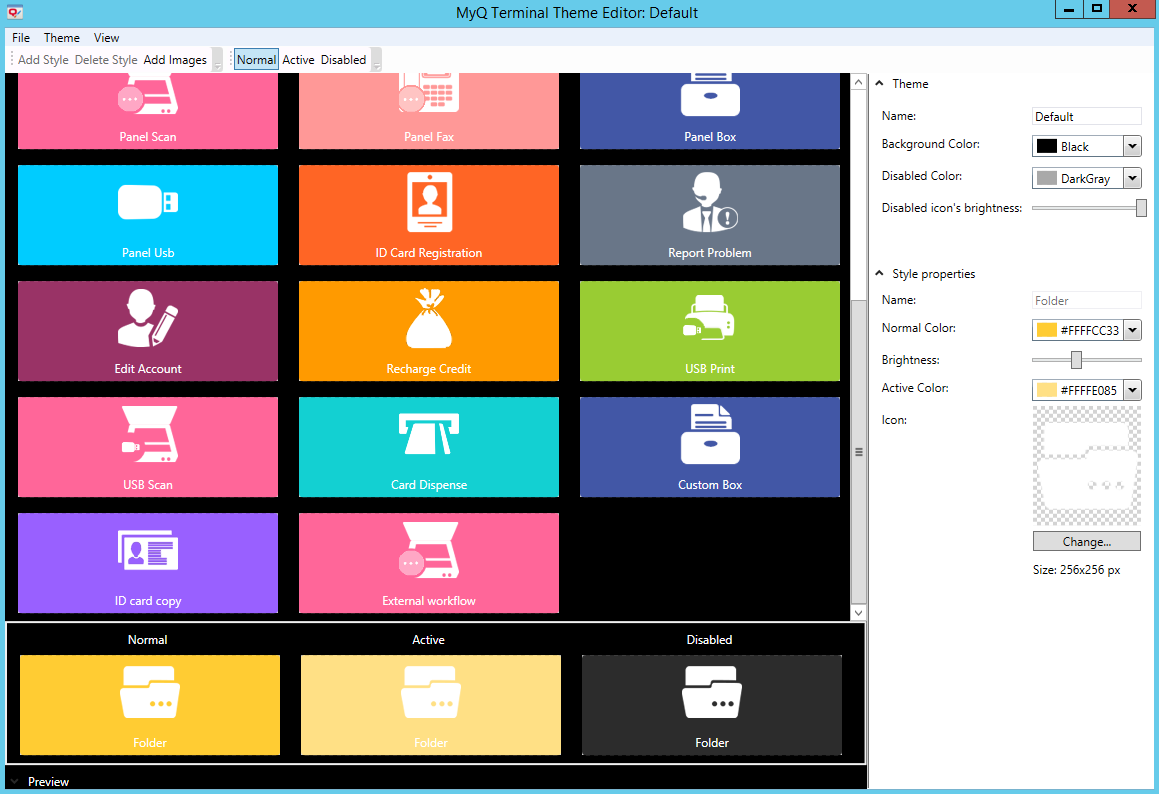
If you kept the Launch MyQ Theme Editor option selected during the installation, MyQ Theme Editor opens once you click Finish on the installation wizard. You can otherwise open it via the MyQ Theme Editor desktop shortcut, or via the Windows Apps menu.
The editor opens with the Default theme loaded.

On the main menu at the top, you have the following options:
File menu
New Theme - Opens a new theme using the default theme template.
New Empty Theme - Opens a new empty theme template.
Open - Opens the Default Themes folder (C:\ProgramData\MyQ\TerminalThemeEditor\DefaultThemes\Default), where themes are stored. Choose a theme (in json format), and click Open to open it.
Save - Saves the changes in the current theme.
Save as - Saves the current theme with additional options (location, name, etc.).
Close - Closes the currently open theme template.
Import Theme - Opens the Default Themes folder (C:\ProgramData\MyQ\TerminalThemeEditor\DefaultThemes\Default), where themes are stored. Choose a theme (in zip format), and click Open to import it.
Export Theme - Exports the current theme to a zip file. Choose the destination for the export and click Save.
Exit - Closes MyQ Theme Editor.
Recent Files - Displays a list of any recently used files.
Theme menu
Add Style - Adds a new style tile in the editor.
Delete Style - Deletes the selected style tile.
Add Images - Opens a dialog where you can browse for and add images (in png and bmp format) to your theme. Select the image and click Open.
View menu
Normal - Displays all the tiles in the normal style. This style is used for any terminal action in an idle state.
Active - Displays all the tiles in the active style. This style is used for any currently active terminal action.
Disabled - Displays all the tiles in the disabled style. This style is used for any currently disabled terminal actions.
The ribbon below the main menu contains the following menu shortcuts: Add Style, Delete Style, Add Images, Normal, Active, Disabled.
You can see all the available styles in the editor. Once you select one, it is displayed in all three different styles (normal, active, disabled) in the preview at the bottom.
On the panel to the right, there are two sections where you can modify your themes and styles: the Theme section, and the Style properties section.
The Theme section contains the following properties:
Name - Add a name for your theme.
Background Color - Choose from the available black or white colors for the terminal’s background. The white background is only available for Kyocera terminals.
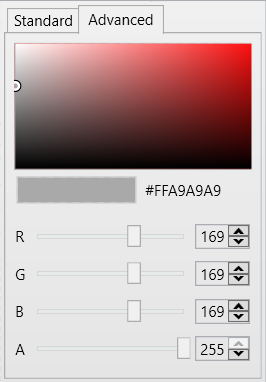
Disabled Color - Choose the color to use for the disabled style. Click on the arrow next to the color. In the drop-down, you can either choose from the available colors in the Standard tab, or go to the Advanced tab and set the RGB hex number of the color of your choosing.

Disabled icon’s brightness - Move the slider left or right to adjust the brightness for the disabled icon.
The Style properties section contains the following properties:
Name - Add a name for the style tile. This is only editable when you add a new style.
Normal Color - Choose the color to use for the normal style. Click on the arrow next to the color. In the drop-down, you can either choose from the available colors in the Standard tab, or go to the Advanced tab and set the RGB hex number of the color of your choosing.
Brightness - Move the slider left or right to adjust the color’s brightness.
Active Color - Choose the color to use for the active style. Click on the arrow next to the color. In the drop-down, you can either choose from the available colors in the Standard tab, or go to the Advanced tab and set the RGB hex number of the color of your choosing.
Icon - Click Change to choose a different icon for your style.
.png)