
MyQ DDI Configuration and Manual Startup
If you plan to use MYQ DDI as a standalone portable installer or before uploading MyQ DDI to the domain server, it is necessary to configure it correctly and run it manually on a test target. The following components are necessary to correctly run MyQ DDI:
MyQDDI.ps1 - Main script
MyQDDI.ini - Configuration file for the installation process
Printer driver files - Necessary files for installing drivers
Printer driver settings file - Optional file for set up the print driver (*.dat file)
The MyQDDI.ps1 file is in your MyQ Print Server folder, by default in C:\Program Files\MyQ\Server. The other files must be manually created.
Do not attempt to copy from the examples in this document - the values are for reference or placeholders only.
MyQDDI.ini Configuration
All the parameters necessary to configure the MyQ DDI are placed in the MyQDDI.ini file. Within this file you can set up printers and their ports as well as load a file with the default settings of a particular print driver.
The MyQDDI.ini Structure
MyQDDI.ini is a simple text file used to add configuration information about printers, ports, and print drivers to the system registry and thereby creating new printer ports and print drivers. It consists of several sections.
Section 1- DDI ID
The first section sets up the DDI ID. This is important when detecting whether this script is a new run or has already run before in the system. After running the MyQDDI.ps1 for the first time, a new record "DDIID" is stored in the system registry. With every run of MyQDDI.ps1 script, the DDI ID from the MyQDDID.ini is compared with the DDI ID, which is stored in the system registry, and the script is executed only if this DDI ID is not equal to the one in the .ini file.
This means, if you run the same script repeatedly, no changes are made in the system and the procedures for installing printer ports and drivers are not executed.
We recommend using the date of modification as referent DDI ID number.
[DDIID]
2024-1-15
If you use value skip, then the DDI ID check is skipped.
[DDIID]
skip
Section 2 - Printer Ports
The second section is for printer port configuration and installation. One or more printer ports can be created within a single script. Printer ports parameters are the standard TCP/IP port parameters for Windows OS.
MyQDDI.ini file uses the [Port-] to identify each port to be created, this is not the name of the port in Windows OS but the port name for the MyQDDI.ps1 internal variables.
Here are some Windows OS standard TCP/IP print port parameters and their translation to MyQDDI.ini:
PortName - Name of port in Windows OS, text.
QueueName - Name of queue in MyQ, text without spaces.
Protocol - Which protocol to use, "LPR" or "RAW", default is LPR.
Address - Can be hostname or IP address. If you use a CSV file, then you can use parameters %primary% or %%.
PortNumber - Port number to use, LPR default is "515".
SNMPEnabled - If you want use SNMP then enter "1", default is "0".
SNMPCommunityName - Name for using SNMP, text.
SNMPDeviceIndex - SNMP index of device, numbers.
LPRByteCount - LPR byte counting, use numbers, default is "1" – turn on.
[DDIID]
2024-1-15

[Port-MyQDDIPortName1]
PortName=WindowsPortName
QueueName=MyQQueue
Protocol=LPR
Address=11.10.9.8
PortNumber=515
SNMPEnabled=0
SNMPCommunityName=Public
SNMPDeviceIndex=1
LPRByteCount=1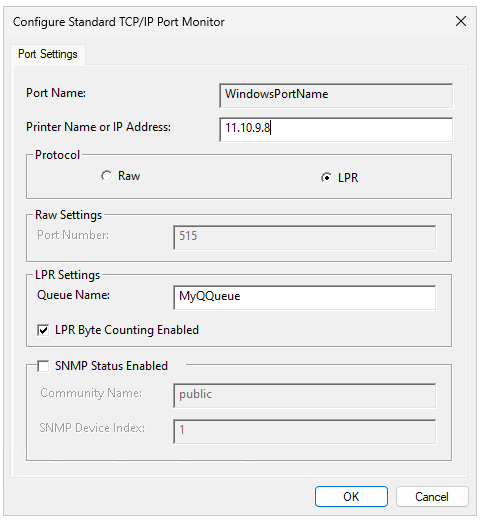
Section 3 Printer and Drivers
This section is used to install and configure the printer and its driver in Windows OS by adding all the necessary information to the system, using the driver INF file and optional configuration DAT file. To install the driver properly, all the driver files must be available and a correct path to these files must be set within script parameters.
MyQDDI.ini file uses the [Printer-] to identify each printer to be installed, this is not the name of the printer in Windows OS but the printer’s name for the MyQDDI.ps1 internal variables.
This section contains these parameters specific to the MyQDDI.ini:
PrinterName - This is the name of the printer in Windows OS.
PrinterPort - Name of printer port which will be used. This refers to the previously set PortName parameter in section 2, NOT the [Port-] in MyQDDI.ini but the Windows OS port name.
DriverModelName - Correct name of printer model in driver.
DriverFile - Full path to print driver file, you can use %DDI% to specify a variable path like: %DDI%\driver\x64\install.inf.
DriverSettings - Path to Dat file if you want set printer settings, you can use %DDI% to specify variable path like: %DDI%\color.dat.
DisableBIDI - This option turns off "Bidirectional Support", default is "Yes".
SetAsDefault - This option sets this printer as default.
RemovePrinter - Option to remove old printer if is necessary (uninstall).
[DDIID]
2024-1-15

[Port-MyQDDIPortName1]
PortName=WindowsPortName1
QueueName=MyQQueue
Protocol=LPR
Address=11.10.9.8
PortNumber=515
SNMPEnabled=0
SNMPCommunityName=Public
SNMPDeviceIndex=1
LPRByteCount=1

[Printer-MyQDDIPrinterName1]
PrinterName=WindowsPrinterName1
PrinterPort=WindowsPortName1
DriverModelName=ExactPrinterNameInDriver
DriverFile=C:\MyQ\Drivers\OEM.inf
DriverSettings=C:\MyQ\DriversConfig\color.dat
DisableBIDI=Yes
SetAsDefault=No
RemovePrinter=No
Driver settings
This configuration file is very helpful if you want to change the default settings of the print driver and use your own settings. For example, you want the driver to be in monochrome and set duplex print as default.
To generate the .dat file, you need to install the driver on any PC first and configure the settings to the desired status.
This driver must be the same as the one you will install with MyQ DDI.
After you set up the driver, run the following script from the command line:
rundll32 printui.dll PrintUIEntry /Ss /n "MyQ mono" /a "C:\DATA\monochrome.dat" g u d rBe sure to use the correct driver’s name (parameter /n) and specify the path (parameter /a) where you want to store the .dat file.
For more information about the rundll32 printui.dll visit rundll32 printui.dll,PrintUIEntry | Microsoft Learn.
MyQDDI.ini example
[DDIID]
2024-1-15

[Port-MyQDDIPortName1]
PortName=WindowsPortName1
QueueName=MyQQueue
Protocol=LPR
Address=11.10.9.8
PortNumber=515
SNMPEnabled=0
SNMPCommunityName=Public
SNMPDeviceIndex=1
LPRByteCount=1

[Printer-MyQDDIPrinterName1]
PrinterName=WindowsPrinterName1
PrinterPort=WindowsPortName1
DriverModelName=ExactPrinterNameInDriver
DriverFile=C:\MyQ\Drivers\OEM.inf
DriverSettings=C:\MyQ\DriversConfig\color.dat
DisableBIDI=Yes
SetAsDefault=No
RemovePrinter=No

[Port-MyQDDIPortName2]
PortName=WindowsPortName2
QueueName=MyQQueue2
Protocol=LPR
Address=MyQPrintServerHostnameOrIP
PortNumber=515
SNMPEnabled=0
SNMPCommunityName=Public
SNMPDeviceIndex=1
LPRByteCount=1

[Printer-MyQDDIPrinterName2]
PrinterName=WindowsPrinterName2
PrinterPort=WindowsPortName2
DriverModelName=ExactPrinterNameInDriver
DriverFile=C:\MyQ\Drivers\OEM.inf
DriverSettings=
DisableBIDI=Yes
SetAsDefault=No
RemovePrinter=No
Notes:
Avoid using special characters for the port name and follow Windows recommendations.
Avoid using special characters for the printers’ names and follow Windows recommendations.
You can create multiple printers’ entries in pairs of [Port-] [Printer-] as shown in the example.
When creating the MyQDDI.ini file in a text editor choose UTF-8 for encoding unless support for regional or legacy characters for printers’ and ports’ names are required.
TCP/IP monitor port in Windows has a limitation for the length of LPR Queue name:
o The maximum length is 32 characters.
o If the queue name is too long, then the script will shorten it to a maximum of 32 characters.
MyQDDI.csv file and structure
Using MyQDDI.csv file, you can setup variable IP addresses of the printer port. The reason is to automatically reconfigure the printer port if the user changes the location with their laptop and connects to a different network. After the user switches on the computer or logs in to the system (it depends on the GPO setting), MyQDDI detects the IP range and on this basis, it changes the IP address in the printer port so that the jobs are sent to a correct MyQ server. If the Primary IP address is not active, then the Secondary IP is used. The MyQDDI.csv file must always be located in the same folder as MyQDDI.ps1.
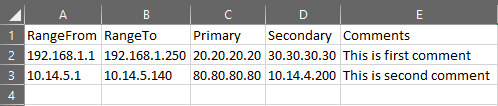
RangeFrom - The IP address that starts the range
RangeTo - The IP address that ends the range
Primary - The IP address of MyQ server; for the .ini file, use the %primary% parameter
Secondary - IP that is used if primary IP is not active; for the .ini file, use the %secondary% parameter
Comments - Comments can be added here by the customer